
DIY Ladder-Style Upright Herb Planter
Posted: March 9, 2017 Filed under: garden, Non-recipe | Tags: building, carpentry, crafts, DIY, garden, herbs 1 Comment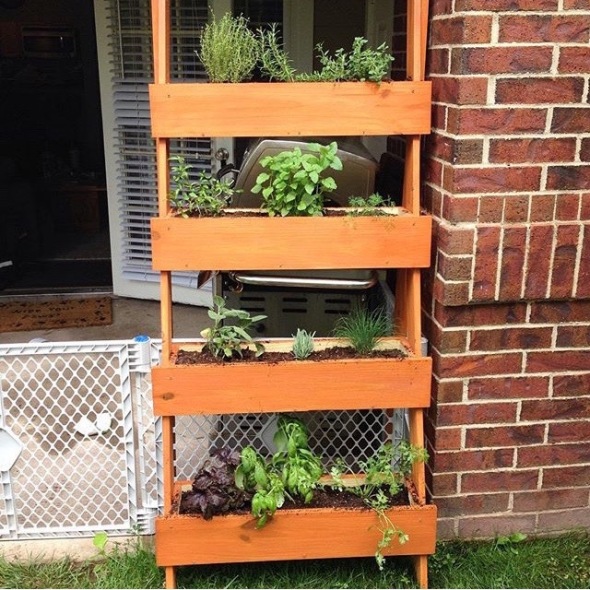
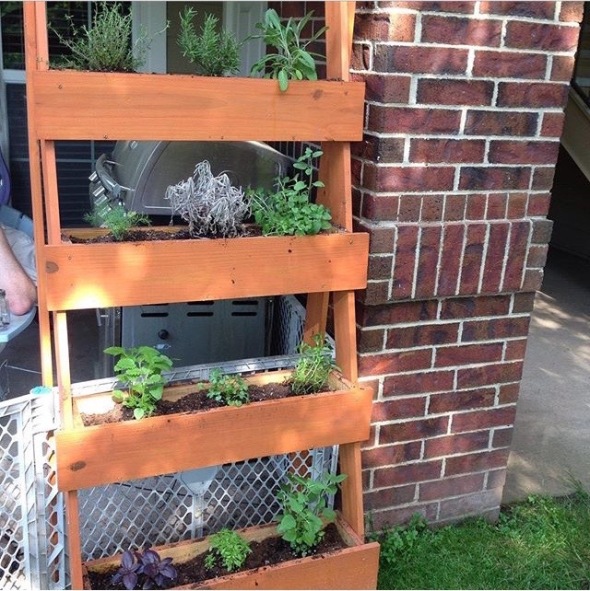
I’ve finally pulled together all the specs to share my herb planter with you! I built this in an afternoon two summers ago and I still remain immensely proud of it! 🙂 It’s nice to have access to herbs near our patio, rather than having to walk up to the garden before I prep dinner (though I do that often, too). I adapted my planter from Ginger Snap Crafts, but I made several changes: I dropped the planter down to just 4 troughs and I added legs so that it could stand freely, instead of leaning. Our patio is covered, so if our planter had to lean on a wall, it would by too far back under the roof and wouldn’t get any sunlight at all. The additional legs allow it to stand on the edge of our patio to take advantage of the afternoon sun.
Also, when I was putting together my planter, I found that the directions weren’t as clear as I would have wished–for instance, while it specified 8 ft long boards, it never gave their width, nor really explained how best to divvy up the cuts needed for the boards. I did some guesswork along the way, so I’ll do my best here to be thorough with my modified herb ladder!
First things first: I was definitely trying to spend as little money as I could, without resorting to dumpster diving or curb-scouting my lumber. So pricy cedar, while beautiful, was definitely out of the question. Since I also knew that I would need extra lumber for the legs to make the planter stand upright, I started to play with the math. I realized that if I cut the number of planting troughs down to 4, I would only need 4 boards to create the troughs. Plus 2 more for the slanted legs and 2 more for the upright legs. That still kept me at 8 total boards of lumber, but, pretty quickly after I looked at the Home Depot website, I realized that I could save some money by adjusting the type of boards I used for the legs of the planter, compared to the type of boards that I used for the troughs. I ended up using the same boards for all for legs, which were thinner in width. In poking around Home Depot for some current prices, thinner boards definitely saved some money. I’m happy to say that (with the lumber I sourced in the links) this planter still clocks in at under $50 to make!
A note on cuts: Home Depot will make a few cuts on lumber for free, or for a few cents, depending on your store. But this project calls for many more cuts than is worth trying to do in the store. Find yourself a saw (and some training in how to use it!) or a friend with a saw and knowledge. I called in a favor with a carpenter friend, who used the saw at M’s work to make the cuts for me in about 15 minutes. A hazard of my theater degree and my varied basic knowledge of carpentry, costuming, etc, is that I look at A LOT of projects and think “I can figure that out. And if I can’t, I have friends who can!” It has held true, so far! Take advantage of your resources, folks! 😉 I also borrowed a drill gun from work (returned in perfectly good form, with the battery recharged!)
So, let’s get started. Here is your materials list:
- 4 boards: 1 inch thick x 6 inches wide x 8 feet long (pine was the most affordable for me)
- 4 boards: 1 inch thick x 3 inches wide x 6 feet long*
- 1 box of composite deck screws (1 5/8 inches long)
- Optional: 1 sample can (8 oz) Weatherproofing Outdoor Wood Stain & Sealer**
*If you think you will be moving this planter often, perhaps bump up to a 4 inch wide or 2 inch thick board for the legs. Mine seem slightly spindly, but since I don’t move it often, they haven’t been a problem. You can also cut out two boards completely, if you want the planter to lean against a wall or a fence.
**Preferably from the reject/discount section, if you are bold enough to risk the color not quite matching the image on the label. My Home Depot taps a bit of the stain onto the lid, so you can get an idea of the color. My stain was also Semi-Transparent, which allows some of the wood grain to still show through.
Your tools needed:
- C-clamp or a second person to be an extra pair of hands
- Drill (preferably cordless) with drill bit and screwdriver bit
- Saw
- Pencil
- Sandpaper
- Optional: level
- Optional: paintbrush + dropcloth
Let’s get started!
Purchase your materials and gather your tools. Measure and make your cuts to the 4 lengths of 1″ x 6″ x 8′ boards:
- Board #1: we cut 3 lengths at 27 inches and 3 lengths at 4.75 inches. There will be a small piece of scrap left over for every board.
- Board #2: the same– 3 lengths at 27 inches and 3 more lengths at 4.75 inches
- Board #3: cut 2 lengths at 27 inches, 2 lengths at 4.75 inches, and 1 length at 30 inches
- Board #4: cut 3 lengths at 30 inches
Now you should have (in total): 8 pieces of wood that are 27 inches long–these are the bottom and backs to each of the 4 troughs; 8 pieces of wood that are 4.75 inches long–these are the sides of your troughs; and 4 pieces of wood that are 30 inches long–these are the front of your troughs.
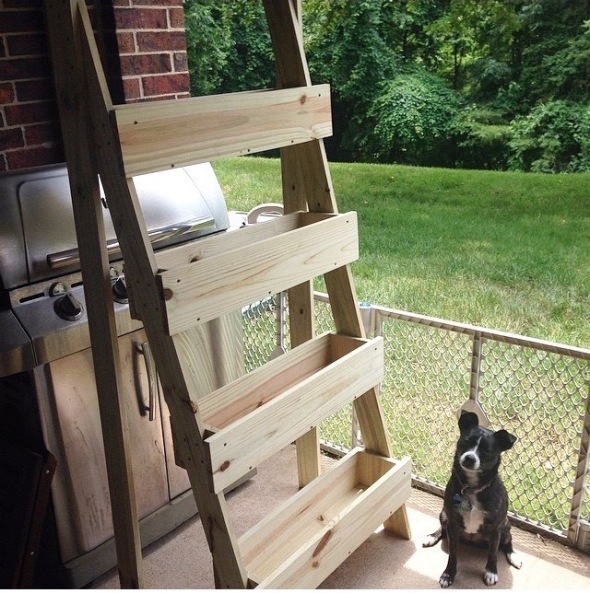
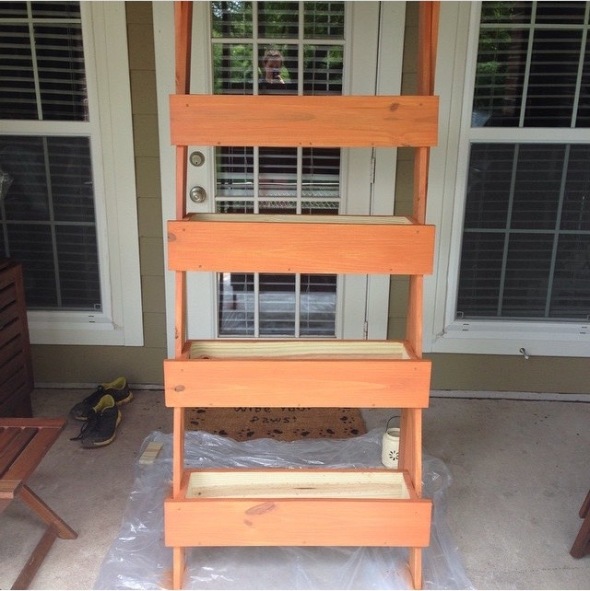
You also have the 4 pieces of 1″ x 3″ x 6′ lumber. These are the legs of your planter. Leave two of them alone and for the other two, cut a 15 degree angle off of one short end. Line it up at a corner and you will be cutting a slight diagonal off. This allows the side legs to be slanting, yet still sit flat on the ground. Look back at the above picture, at the bottom of the leg nearest the dog.
Now you are done with cuts! Let’s get started putting this together!
Start by making your troughs: The bottom piece will be sandwiched in between the back piece and the front piece, rather than capping/overlapping the sides. So, if the bottom board is flat on the ground, the back and front piece come down on either side to also touch the ground. This is because your very short 4.75 inch side pieces sit in the U-shape made by the back, bottom, and front pieces. So the hole in the trough is a full 6 inches wide by 25 inches long (you lose an inch to each side-piece) by 4.75 inches deep. Make sense? I’m doing my best to explain, but this was definitely where I had to stop to figure it out. The pieces should fit together like a puzzle. If you are confused, take 2 each of the 27-inch lengths and the 4.75-inch lengths, plus one of the 30 inch length and just hold them together (without fastening them) until you side the box. Remember, the front has excess that overlaps on each side by 1.5 inches, to eventually overlap the side leg boards. Click through the Ginger Snap Crafts link above, she has some photos that help to visualize all of this!
I started by screwing together the bottom and the back boards, because they were even in length. I just stacked some extra pieces to hold steady the board and screwed it into place with 3 screws along the back seam. The I added the 30-inch front board, so I was making a U-shape, or 3 sides of a square. I centered the board so that there was 1.5 inch overhang on either side, and then screwed the front piece in with 3 screws. Then I was able to wedge in the 2 small side pieces. These, I secured with 2 screws (one at the top and one at the bottom) of the back board and with 1 screw at the top of the front board. That is one trough done! Repeat 3 more times until all 4 troughs are built. Swap your screwdriver bit for a drill bit and drill 3 to 4 drainage holes in the bottom of each trough, to ensure that your herbs’ roots won’t be drowned.
This is when that second person or your C-clamp becomes your best friend. We are going to attach the 4 troughs to one of the slanted side legs.
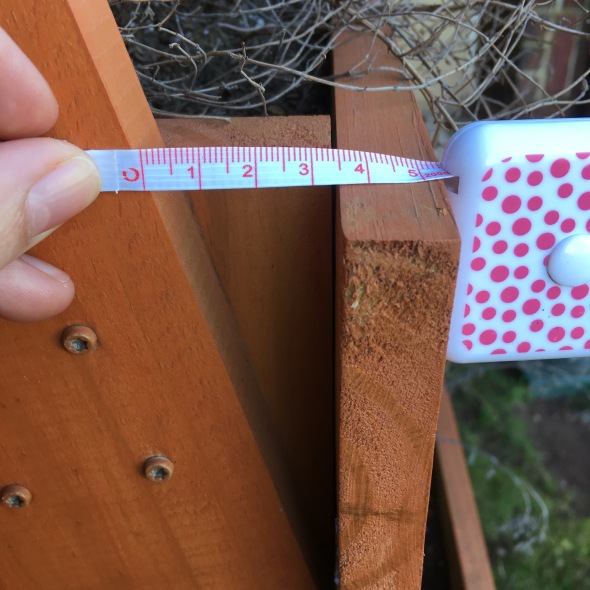
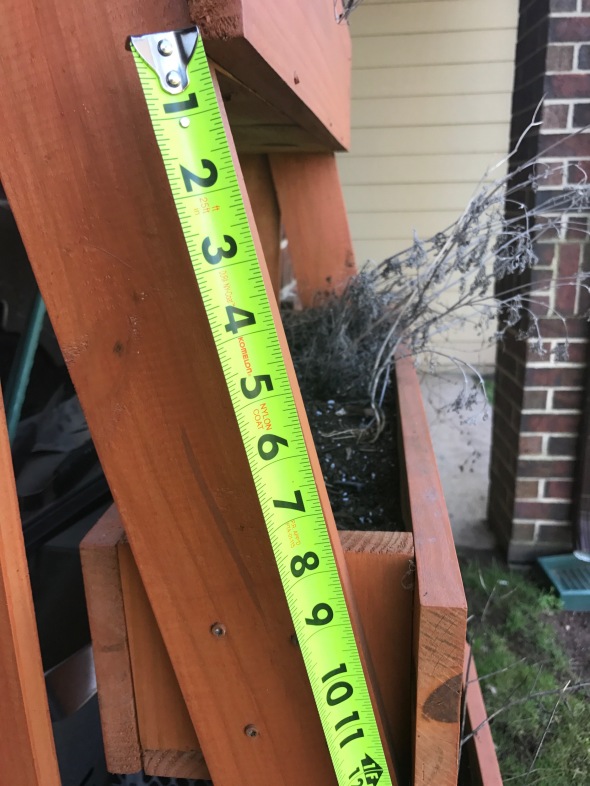
I started the first trough so the bottom about 4 inches up the slanted leg off the ground, but you could even go higher and have the bottom of the trough be 6 inches off the ground. I measured 12 inches along the slanted side leg between the bottom of a trough and the bottom of the next trough up (below). I also placed the troughs at angle, so the overhang of the front board was straight up, and there was about 3.5 cm space between the front edge of the slanted side leg and the front board of the trough (above). I marked the diagonal line in pencilon the side-board of the trough, to line up with the legs and then I also marked on the leg where the top and bottom of each trough should line up. I set each of the four troughs on their side so they stood upright, then laid the slanted leg board over top of all four troughs and adjusted until each trough lined up with my marks. Make sure that the diagonal cut–remember the 15 degrees we took off of one end of two of the boards?–is DOWN. The diagonal end will sit flat on the ground! That’s what gives you the ladder-style slant. Scroll back up to the photo of my un-painted planter and look at the bottom of the front leg near Punc. See how the diagonal is resting completely on the ground?
Starting at one end, clamp the side leg and the trough that you are about to screw on. I used 4 screws in a square-ish pattern to secure the trough side to the slanted leg. Once secure, undo the clamp and move on to the next trough, making sure to keep all of your marks lined up with the appropriate edges as you clamp it down. After securing all four troughs, you can flip it over as one piece and line up the second slanted side leg. Make sure that you re-measure and re-mark with your pencil the angle on the other side of the troughs and where each trough should land along the second slanted leg. Repeat with the clamping and securing each trough. Now you should have a 4-trough planter on two slanted legs. If you simply want it to lean against a wall or a fence, you are done building!
If you want your planter to stand upright on it’s own, you need to attach the two final, straight legs in the back of your planter. I lifted my trough-side leg combo and leaned it against a wall so that I could be sure that the planter was level and my diagonally cut bottoms of the slanted side-legs were flat on the ground. Then, I slipped the two straight boards on the outside the slanted legs, making sure they were upright, with their straight bottoms flat on the ground. I clamped the two legs together above my top trough and secured each side with 6 more screws evenly space throughout the space where both legs came together. Then I repeated the process on the other side.
AND NOW YOU HAVE A PLANTER! Celebrate! Get a cold drink! You aren’t done, though. 🙂 You could be. The planter is built and it will hold plants and soil. But the wood is completely unfinished and it will eventually degrade in all the weather outside. If you would like to prolong the life go the planter, you should seal the wood. I did not seal to inside of my troughs, where the soil and plants will go, so as to minimize the chemicals that might leach into the soil and then into my plants. However, I did seal the outside of the planter, to better protect against the elements. If you are going to paint the wood, spend a little time smoothing all of the wooden surfaces with sandpaper. Especially your cut sides, which will be the roughest. I like to use a dry paintbrush to go over all the surfaces after sanding, just to really make sure that all of the sawdust is off of the surface of the wood before I paint.
The paint I’ve linked to, above, is the type I found: meant for the outdoors, meant for weatherproofing, meant for use on wood, and–best of all–a stain/sealer combo which means that I didn’t have to paint/stain the whole thing and then do it all over with the separate sealer! Win! My sample can was just barely enough to put 2 thin coats of stain on all of the outside surfaces of the planter. I did one coat in the afternoon and the second the next morning. Follow the directions on the can–mine required the stain to “cure” for 72 hours without getting wet. This was pretty easy, since our patio is covered. I moved it as far back as I could to keep it shelter, because, of course, it rained during those 72 hours, but my planter was no worse for wear.
NOW YOU ARE DONE! After 72 hours–or whatever time is recommended on your can of paint/stain/sealer, you can fill up each trough will soil and start planting! Just remember, like potted plants, these plants in the troughs need to be watered more frequently because the shallower soil will dry out more quickly. This summer, my planter will be 3 years old and it have held up beautifully!
Garden Plan 2016
Posted: March 18, 2016 Filed under: garden, Non-recipe | Tags: garden, gluten-free, grow your food, herbs, plants, square foot gardening, vegetables, whole foods 2 Comments
Spring Break! Wahoo! I’m planning to get all kinds of crazy and…work through it. Haha! I had my grad student spring break last week, though that only meant that I did not have my classes in addition to work. This ended up being ideal, because I caught some kind of plague from my coughing, sniffling students and suffered through some kind of horrible chest congestion all of that week. I was very happy that I could go home to sleep rather than drive out for my evening classes. Next week is the public schools’ Spring Break, which means we are working even more as we host a Spring Break Camp. We’ll have the kiddos with us during the day, learning all sorts in fun theater workshops. But Spring Break also means that I have two weeks off from our Saturday rehearsals. This means that I get to check out the early spring farmers market and I get to plant the garden!

I learned a lot last year, in my first foray into square foot gardening. This year, I’m sticking close to the plan, but adjust some spacing so that we use the space better. The biggest change will be that I plan to border our box with a row of onions and radishes on all four sides. One square would hold 16 plants, but instead, I can take a few inches around the edge to grow an pile of them! I use onions in almost everything, so I am quite excited! I’m adjusting the plants on the inside slightly. I am going to try growing strawberries this year, though I don’t have high hopes of getting to the berries before the squirrels or the neighborhood kids (who don’t seem to understand that the garden isn’t their own personal buffet). I am also focusing on sturdier greens: bibb lettuce, romaine, spinach, and, eventually, kale and swiss chard. The mesclun mix that I planted last year never really sprouted and I never got around to my Fall planting for the hardier greens. I’m planting a little earlier, since our March has been so warm. I’m hoping this will help out my early spring greens. Tomatoes, peppers, and snow peas are all making a second appearance this year. After the success of the jalapeños last summer, I think I may just stick with them and try to up my spice tolerance. I didn’t get a single flower from last year’s poblano plant. Last year’s bush beans never thrived, so I am trying pole string beans this year. We love green beans, so I am hoping that they will do well!

This year, my patio herb ladder (tutorial coming soon!) is also ready, so I will be able to plant my herbs early. I think some of the more tender plants, like cilantro and dill, were planted when it was too hot for them to really take root well. I am able to fit the full kitchen collection of herbs into my four troughs: cilantro, two kinds of basil, thyme, rosemary, tarragon, sage, dill, lavender, lemon balm, and oregano. This year, I’m adding Bee Balm. My gardening book suggests steeping it like tea. I’ll have Thai basil, chives, and parsley in the garden plot again. I’ll try planting a cilantro out there too–that herb seems to give me the most trouble. Maybe a little more space will be what it needs! The chives are the only thing growing in the plot at the moment. They seem quite happy, so I’m hoping for the slim chance that we’ll have chive blossoms by Easter. I loooove chive blossoms paired with goat’s cheese. That sounds like the perfect appetizer before Easter dinner!

The herbs will still be planted well after the seeds are planted in the garden plot. I am hoping to plant the Spring seeds this weekend. Saturday should be beautiful and warm. Snow is on the forecast for Sunday, but only flurries with the temperature above 35 degrees. The rest of next week gets back into the high 60s, so I’m hoping the little seeds will whether one chilly night without any problems. None of them will be sprouting yet, so they shouldn’t be too fragile.

I aim to be better at posting about the garden. I have photos from last year, but my notes are not as detailed as I’d like. Hopefully, I can keep this blog updated and have a nice record for my future self!


