Grocery Budget & Meal Plan for Feb. 26-Mar. 4
Posted: February 27, 2017 Filed under: Budgeting, Meal Plan | Tags: cheap eats, grocery budget, meal plan 1 CommentI am having a pretty great Sunday, how about you?
My crazy balancing act of work-homework-internship-housework-social life actually stayed in check this week! After work yesterday, I managed to come home and finish my homework, which took a huge weight off of my shoulders. Since Sundays are my only day off of work each week, they tend to be filled with all of my catch-up tasks. More often than I’d like, this means most of my homework, all of the cleaning and laundry, and meal prepping. I never actually get through my To-Do list on Sundays, and–this year, especially–it leaves me totally stressed out. I am trying to develop evening routines that break up my housework into manageable, small tasks each day, but this has been a really tough habit for me to develop. In fact, it’s only the dream of someday having a Sunday with actual downtime that keeps me at that habit.
I didn’t get much cleaning done during this week, but I did reorganize our bookshelves to make room for my cookbooks, so that I have more food storage space on top of our pantry. (Mostly because I found copper-trimmed mason jars to store my beans and lentils and they were not getting shown off as they deserved!) But getting my homework out of the way was just enough to remove the stress! My to-do list today was super manageable, and I even was able to tackle a few extraneous tasks that have been bugging me–like reorganizing our linen closet and cleaning my desk! I had a little downtime when I went to my mother’s to pick up eggs and all in all, today has been industrious, yet satisfying!
I do have a confession to make, though: I was over budget this week. 😦 By exactly $0.50 and that was only tax, but over my $50, just the same. However, I went over budget by grabbing a whole chicken for $5.04, so it was totally worth it! I will get at least three meals out of that chicken, plus having all the bones to make another batch of bone broth. I also have a quiche in the oven right now, which is another one of my favorite cheap “stretch” dishes. Normally, a few eggs, several slices of bacon, and a cup or so of veggies would possibly stretch to 2, maybe 3 breakfasts for M and I (if I’m stingy with the bacon and we add some toast into the equation). Theses same ingredients, mix with a little milk or cream and tipped into a pie crust, will give me 8 hearty servings! Add some roasted potatoes or other vegetables alongside to mix up these leftovers for lunch or dinner!
Here is the breakdown for this week:
Hungry Harvest Produce Box: $15.00
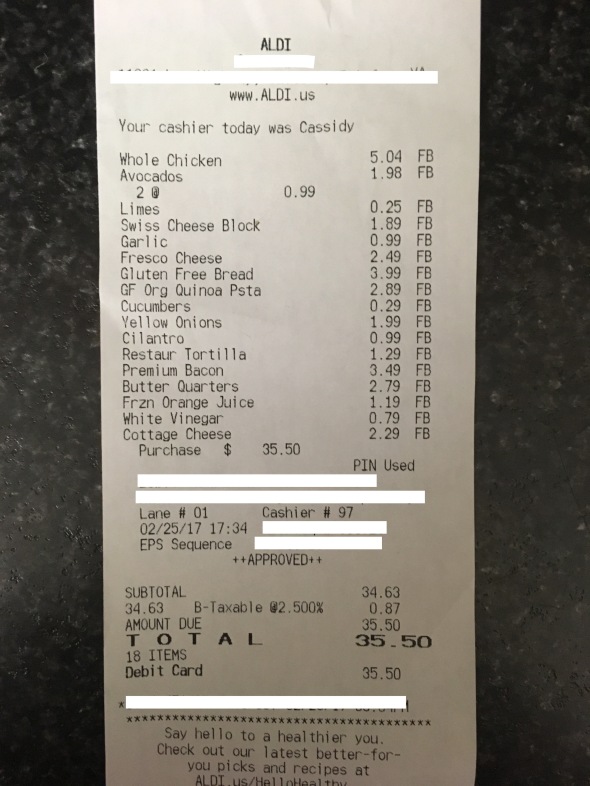
Aldi: $35.50
Total: $50.50
This week’s groceries:
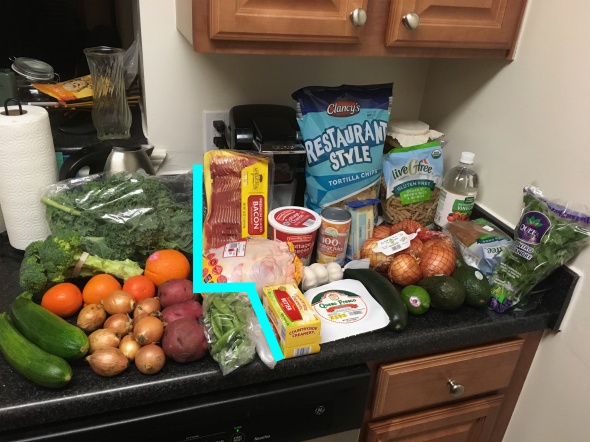
HH Produce Box: 2 zucchini, 1 lb. tiny onions, 3 tangelos, broccoli, kale, 1 orange, 1.5 lbs red potatoes, and sugar snap peas.
Aldi: bacon, whole chicken, butter, cottage cheese, garlic, queso fresco, cucumber, frozen orange juice concentrate, tortilla chips, swiss cheese, onions, lime, avocados, pasta, white vinegar, bread, cilantro
Plus 8 eggs from my mother’s chicken hook-up. 😉 And here is how we are using this week’s groceries:
Sunday: Turkey & Broccoli Quiche with roasted Potatoes A couple of eggs, the last of the half-n-half from a few weeks ago, some of the bacon, butter in the crust, half the swiss cheese, an onion, plus turkey & broccoli from the freezer. And some of last week’s potatoes.
Monday: Pasta Primavera using the pasta, some of last week’s milk, the remaining parmesan from 4 weeks ago, some of the garlic, zucchini, snap peas, kale, and broccoli from this week, plus some peas from the freezer, and red peppers from our box a few weeks ago.
Tuesday: Leftovers/Crepes I am hoping to get my act together to make crepes for Fat Tuesday, but, worse-comes-to-worst, I know there will be some quiche left (which is not bad at all!)
Wednesday: Out at M’s mum’s house I’m not sure what we are doing for dinner.
Thursday: Citrus-Braised Pork Chilaquiles + Avocado Salad from Date Night In I’ve already talked about how much we love this cookbook and these chilaquiles. I stocked up on the pork last week, but I’ll use the orange juice, cilantro, tortilla chips, onions, lime, garlic, queso fresco, and avocados from this week, plus bone broth from the freezer.
Friday: Citrus-Braised Pork sandwiches with quick cucumber pickles and roasted potatoes with broccoli Definitely making enough pork for a second dish. We have a lot of GF hamburger buns taking up valuable freezer space, so I’ll use up a couple of those. With that cucumber running me $0.29, these quick vinegar pickles will be the cheapest topping that I make all week! Plus, I’ll use up more of last week’s potatoes and the rest of the broccoli.
Saturday: French Onion Panade with Kale Salad This panade is like the best part of French Onion Soup. It even has the same flavors, you just lessen the amount of broth and up the amount of bread to make a sort of savory bread pudding. I’ll use up all of those tiny onions, the rest of the swiss cheese, the last of my bone broth (a new batch will be started this week), and some GF sourdough bread that I unearthed from the freezer. The salad will use up more of the kale, plus some of the cranberries from last week and whatever cheese is left!
Breakfasts will be eggs, toast, oatmeal, or cottage cheese with fruit. Lunches will be leftovers or sandwiches with the deli roast beef from a few weeks ago, plus the remainder of the sugar snap peas from our box. I am going to try to get my act together to make a batch of zucchini muffins as well, which will supplement breakfast or snacking!
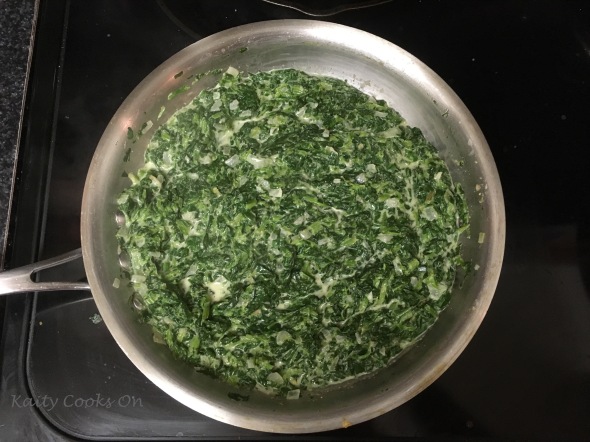
Coconut-Creamed Spinach
Posted: February 23, 2017 Filed under: Recipes | Tags: dairy-free, gluten-free, side dish, spinach, vegetarian 1 Comment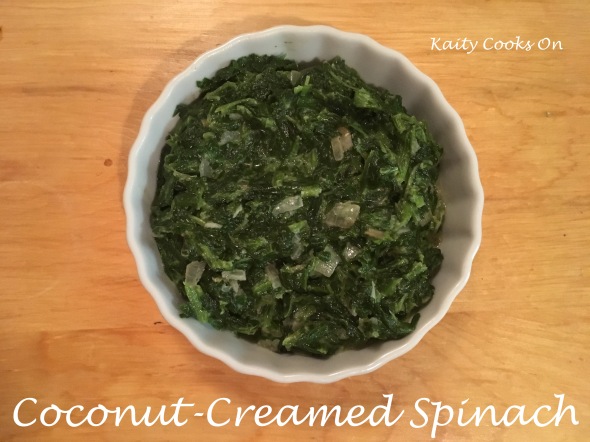
It doesn’t look like much, but it is totally delicious!
How is your week going? It seems like everyone either has massive winter storms or unusually spring-like weather. We are in the latter, with our afternoons reaching almost 70 degrees! It has been a lovely respite, in a certain sense, but a little unsettling. It is still February, after all. Will we even have a winter season this year?
I’ve been starting to think about my garden plans for this year, because the extended forecast is still staying pretty mild! I think I will be aiming to put a few hearty green seedlings into the ground within the next couple of weeks: swiss chard, kale, etc. Whatever I can get my hands on, knowing that this isn’t actually planting season. Normally Home Depot fills my seedling needs, but I may need to venture to an actual garden center to find seedlings. I also need to check the almanac for the last predicted frost, but I’m feeling pretty confident about planting seeds soon, as well. I’ve always felt like I start my seeds too late, so this mild winter may be the reason that I finally get them out on time! I’m still planning to use square foot gardening, but I am expecting to tweak a little from last year’s garden plan. It was not as successful as my first year, unfortunately. I didn’t really get any onions or carrots last year, and I bought tomato plants that were too big for my box. This year, though, I’ll learn from those mistakes!
I am also dreaming of a patio makeover. And I am determined to make those dreams a reality! Our patio is the one part of our apartment that I’ve also felt was a little neglected, so I’ve been saving up a few dollars here and there for a cheap update! Some actual decor, perhaps a few pillows, maybe some new (cheap) chairs, and a new grill! I will keep you posted on our progress!
This Spring weather also has us see-sawing back and forth between comforting winter meals and lighter Spring ones. Which is why I keep finding my meal plans full of slow-cooked, heavily spiced Indian dishes and soups…or sushi. Haha! On Sunday, I let myself play in creating a big vegetarian, Indian meal. I had wanted to make Paneer cheese again (I’d give myself about an 85% success rate with this batch…insufficient draining, I think) and we had potatoes and cauliflower to make Aloo Gobi, so I rounded things out with a batch of Coconut-Creamed Spinach, which is totally my go-to side dish for any Indian food! I’ve talked before about how I am working to appreciate cooked greens more and this is one of the few cooked greens dishes that I will always enjoy! It is so delicious over a bit of rice, creamy and comforting and full of flavor! Light Indian spices and coconut milk instead of cream give this dish an unexpected twist, without being too overpowering. A healthy dose of garlic and salt, with a little heat, are still required, just like in regular creamed spinach.

Coconut-Creamed Spinach
- 2 packages frozen spinach, thawed
- 1 can (15 oz) coconut milk
- 1 small onion, finely diced
- 3 cloves garlic, minced
- 1 tsp. garam masala
- 1/2 tsp. ground ginger
- 1/4 tsp. ground cumin
- 1/4 tsp. chili flakes
- 2 tsp. coconut oil
- salt & pepper
Press the thawed, frozen spinach into a mesh sieve to squeeze as much water as you can from it. Leave to drain as you cook the onion. In a sauté pan over medium heat, as the coconut oil and the diced onion. Cook, stirring occasionally, until the onion has softened and is mostly translucent. Add the minced garlic and the spices (garam masala, ginger, cumin, and chili flakes) and stir the whole mixture for about 2 minutes, until the garlic and spices are fragrant. Add the drained spinach to the pan and stir to combine with the onion. Pour in about half of the can of coconut milk, stirring until the spinach mixture loosens up and the coconut milk in incorporated into the mix. Add the remaining coconut milk and simmer the mixture until the desired thickness–the milk should hold together everything: the liquid shouldn’t pool from the greens. It should only take a few minutes, at most! Add a hefty pinch of salt and pepper, taste, and add more salt if needed!
Weekly Grocery Budget & Meal Plan for February 19-25
Posted: February 19, 2017 Filed under: Budgeting, Uncategorized | Tags: budget, grocery budget, meal plan Leave a commentI scored majorly this week! We had a very good produce box this week, even creating one of those serendipitous moments of including a cauliflower and potatoes for the week when I was toying with the idea of Aloo Gobi (Indian Cauliflower & Potato Curry)! I am still really digging Asian–type flavors this week. Plus, after finding out that Aldi stock’s gluten-free imitation crab, I knew I would also be making California rolls. Super exciting!
Once the box was confirmed and I was making my list for the store, I knew I was going to have a fair amount of extra money left over…it turned out to be around $11, so I able to spend NINE DOLLARS to stock up on a 5+ pound pork butt! That is the toughest thing about this $50 budget–that there is rarely ever enough remaining money to cover those bigger cuts of meat (that are actually quite cheap in terms of dollars-per-pound, but still require a slightly steep investment up front). Believe me, I am trying to get creative with how I save up for them–maybe I’ll tuck the changes away each week until it builds to $10-$15. Either way, by using our pantry a lot this week, I did manage to squeeze in the pork butt (and a treat: potato chips!) I’ve already portioned the pork into 3 different 1.75 lb bags in the freezer. You can bet that Citrus Pork Chilaquiles from Ashley‘s Date Night In Cookbook will be on the menu next week.** The other ingredients with be a little bit of an investment–things like orange juice, avocado, tortilla chips, and queso fresco with run me between $1-$2 a piece at Aldi. But I will get creative with the rest of the week’s meals in order to make it work because these chilaquiles are HEA. VEN. LY!
If you are careful with your pantry items and invest in spices, there is absolutely no reason to boring, flavor-lacking food when you are eating on a budget. As you may noticed, M and I favor super bold cuisines: Thai, Mexican, Indian and eat dishes from those cuisines fairly often! Spices are the absolutely key to keeping things interesting! I’ve found that cheap spices can be found in the “Mexican/Asian” aisle of regular Giants. They have very cheap bottles of garlic powder, oregano, cilantro, etc and even had little baggies with a couple whole star anise or a few whole nutmegs for like $2! Check it out, and try to put together a few dollars towards spices every other week–you will soon be on your way to a flexible and useful spice cabinet!
**This is not a paid endorsement at all. M got me the book for Christmas two years ago and I just love it! The chilaquiles is our absolute favorite recipe…with Basil Mint Bourbon Jubilees coming in close behind!
This week’s tally:
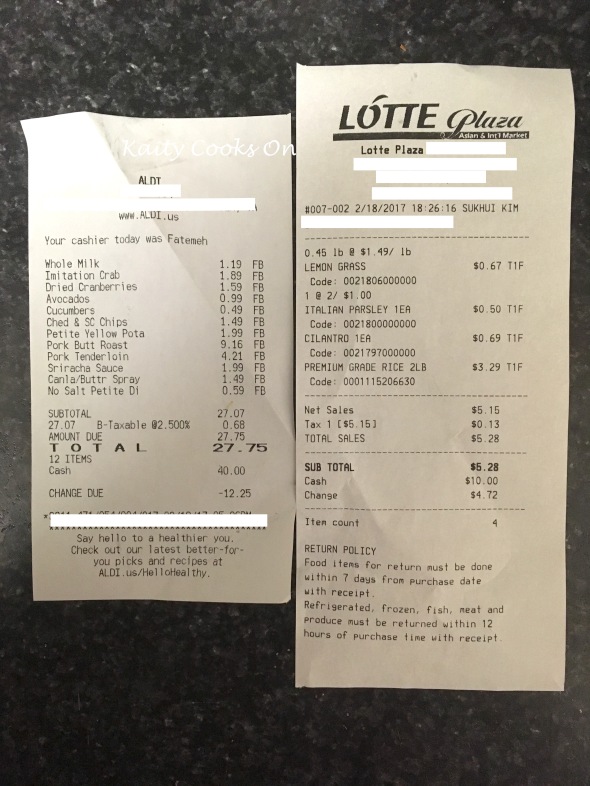
- Hungry Harvest Produce Box: $16.50 (added on the grapefruits)
- Aldi: $27.75
- Lotte Asian Market: $5.28
- Total: $49.53 (If I hadn’t had those stock up/splurge items, we would have barely cracked $35 this week!)
This week’s groceries:
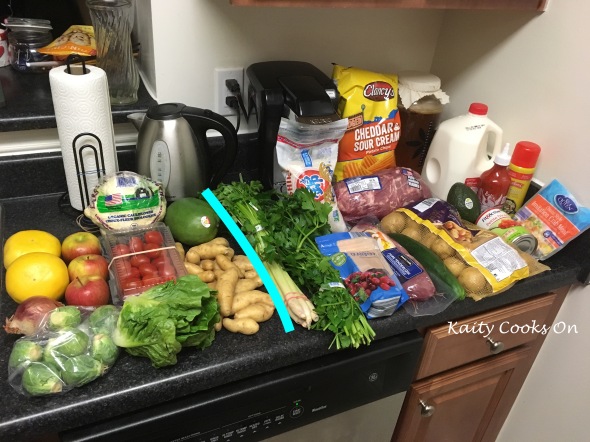
Hungry Harvest Box: 2 grapefruits (add on), 1 red onion, 0.5 lb brussels sprouts, 3 apples, 1 head of organic cauliflower, 1 pint cherry tomatoes, butter lettuce, 1 mango, 1.5 lb fingerling potatoes.
Lotte Asian Market: whole lemongrass, fresh cilantro, fresh parsley, 2 lbs sushi rice
Aldi: dried cranberries (stock up), 1.5 lb pork tenderloin, 5.12 lbs pork butt (stock up), chips (splurge), cucumber, 5 lbs potatoes (stock up-forgot about the fingerlings in HH box), avocado, diced tomatoes, milk, sriracha (stock up), cooking spray, imitation crabmeat
Here is how we are eating this week:
Sunday: Paneer Masala, Aloo Gobi, Coconut-Creamed Spinach, & Rice I’ll be making the paneer with that gallon of milk and some lemon juice! It is so simple and I should get between 12-18 oz of cheese for about $1.50. I’ll cook down a masala sauce with the tomatoes, some spices, and some of the half-n-half from two weeks ago. The spinach is from two weeks ago and the coconut milk is from last week’s grocery trip. The veggies from the box will pair with spices for the Aloo Gobi and we purchased a huge 15 lb bag of rice ages ago, that we have been slowly working our way through.
Monday: I’m out late with meetings for my internship. I will probably grab something on the run.
Tuesday: Leftovers M is out and I work late. I’ll eat leftovers or some scrambled eggs when I get home.
Wednesday: Pork Tenderloin, Roasted Brussels Sprouts, & Fingerling Potatoes with Mojo Verde sauce M will be cooking while I’m in class. Mojo Verde will someday make it up here on the blog–it’s similar to chimichurri. An herby sauce with cilantro, parsley, garlic, vinegar, and all sorts of tasty stuff!
Thursday: Sushi! A big old batch of rice will get rolled into California Rolls, veggie rolls, maybe I’ll even break out the shrimp if I’m feeling fancy! Check out my last post for a step-by-step guide to rolling sushi!
Friday: Larb Gai I’ll mince up some chicken thighs with the freezer and sauté them with my pantry items (fish sauce, lime juice, etc) and cilantro and serve with the red onion and butter lettuce for a light dinner.
Saturday: Odds and Ends Whatever I’m feeling like. I know I need to use up the eggplant and do something with tomatoes! We will still have chicken thighs and a few sausages in the freezer, if I want some meat.
Breakfasts will be eggs or oatmeal or fruit and toast. Lunches will be leftovers or sandwiches using the roast beef from last week!
How to Roll Sushi
Posted: February 16, 2017 Filed under: Helpful Hints, Non-recipe | Tags: healthy eating, homemade sushi, sushi, vegan, vegetables, vegetarian 1 CommentNot exactly a recipe today, but more of a technique post. But I do have a few sushi recipes, that can be shared here, now that I’m covering the basics!
Since I know you have all been waiting with baited breath to hear what M picked for Valentine’s dinner…(haha)…surf and turf! Perhaps a little traditional, but oh so delicious! He grabbed some personal-sized sirloin steaks and a cluster of snow crab legs for each of us! It was so, so good! I think it’s actually been over a year since I had crab legs and I definitely will have to do some scrimping and scrounging of pennies and some careful sales watching so that we can have them again before this year is over! I’ve admitted to my own recent conversion to seafood-appreciator on this blog before, but I had forgotten how much I like crab! Especially the legs, because the insides and organs and gunk of blue crabs still grosses me out. Plus I’m bad at picking those little legs. Please give me those (somewhat) tidy clusters of snow crab legs!
Yummmmmm. I thought about those crab legs and butter all day. I also spent the day enjoying my Valentine’s gift of a brand new office chair! It’s red, it’s sleek, it has any amount of support…perfection! I’ve had a sad history of used and often-broken office chairs, though my latest model was doing just fine enough for me to stop complaining about my back pain (mostly). But, M remembered and got me one and totally surprised me at work–enough to have me on the floor teary-laughing! So I am very excited to adjust this exactly how I need it and improve my daily office life!
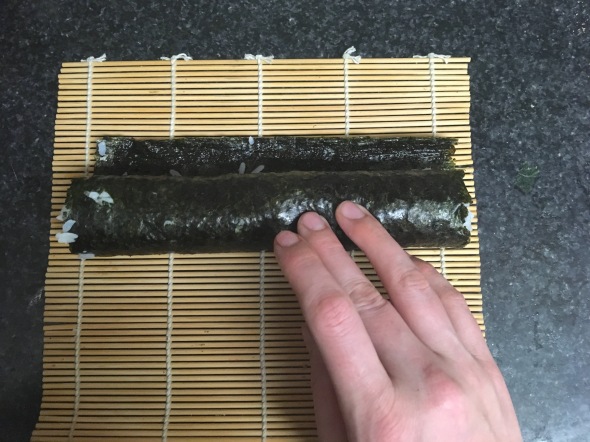
Anyways, I thought I would take advantage of the simple cucumber rolls in this week’s meal plans to take a few step-by-step photos to show how to roll sushi. I’ll be honest: the thought of making sushi was on my list of Very Intimidating Cooking Things. (Side note: if you’ve been reading along for a while, you should be celebrating with me because you also realize that I have now tackled everything on that scary list!!!) But then I finally did it and it really can be very not frightening and even almost easy, if you are kind to yourself! The biggest impetus was honestly that sushi is so expensive! It it so much cheaper to make at home, and if you are very, very nervous, then just start practicing with some veggies rolls that will cost you pennies! But they look super fancy and taste delicious and still have that sushi magic of filling you up without much food actually being used…I still prefer the ease of keeping the seaweed on the outside of the rolls–still got all the right flavors in there! Someday, perhaps, I’ll be brave enough to flip the rice to the outside!
Let’s get started!
First make your rice. Be sure to use rice marked as “Sushi” or “Nishiki” rice! Prepare according to the bag’s directions. I usually bargain for about 3 sushi rolls-worth from 1 cup of uncooked sushi rice. Remember, 1 cup uncooked is going to result in several cups of cooked rice!
After the rice has cooked and steamed according to the package directions, for every 1 cup of uncooked rice that you made, mix together 3 Tbsp rice vinegar + 1 Tbsp sugar + 2 tsp salt in a small bowl until the sugar and salt has dissolved (if I’m in a hurry, I’ll microwave this, since the warm liquid will dissolve the salt and sugar more quickly!) Fluff the cooked rice with a fork, then pour over the vinegar mixture and mix gently, but well to distribute the flavor! Continue to stir gently for 1-2 minutes more, to help the rice release steam and cool. Cool the rice to room temperature.
Prep your sushi filling–thinly slice whatever you are putting in there: fish, veggies, etc.
Fill a bowl with water, grab your nori (seaweed sheets), put the filings and the rice beside you, and you are ready to go!

Okay, so you do need to invest in a sushi mat. I found them for a very reasonable price at my local grocery store–it came in a kit with a wooden spoon that can be used instead of the fork to stir the vinegar into the rice! While it is possibly to roll sushi without a mat, it make it so much easier that it is definitely worth the investment! Place the mat in front of you with the sticks running perpendicular to you.
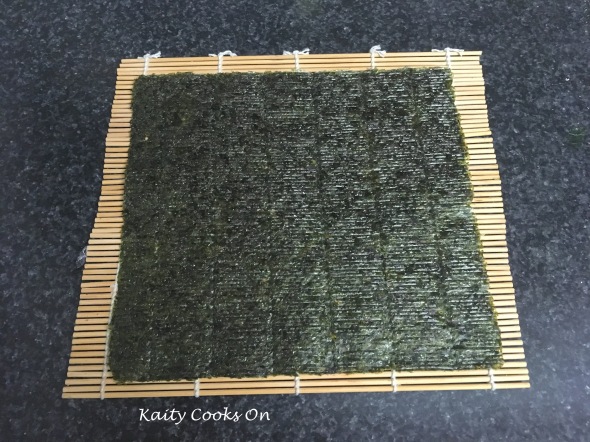
Put a sheet of nori on the mat.
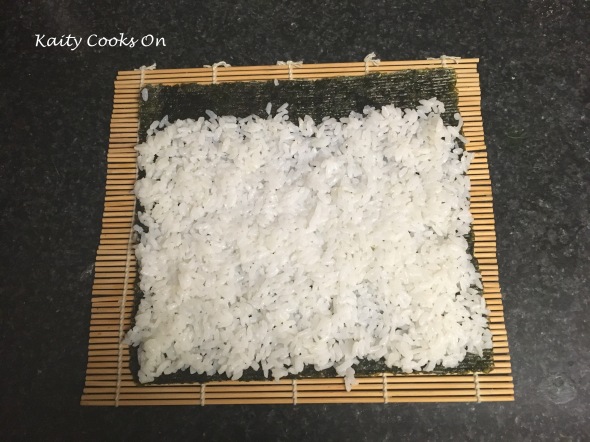
Dip your fingers in the water. With WET hands, scoop two small handfuls of rice onto the nori. Wet your fingers again and press the rice into a thin layer. Leave about 1 inch of space at the far end of the nori, but make sure that the rice goes close to the other edges. If your fingers are not wet enough, the rice will stick. Keep dipping them in the water as needed.
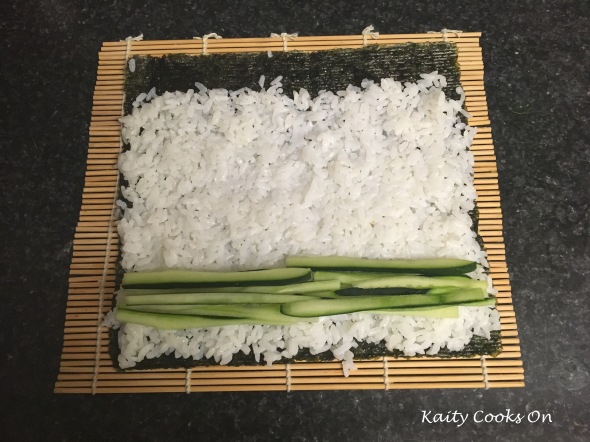
Lay your fillings on the near end of the nori sheet. Try to make them even, across the whole sushi roll.

Grasp the edge of the mat with your thumb and forefinger (with both hands, I just needed one hand to take the photo). Use the rest of your fingers to press against the fillings. Lift the sushi mat and begin to roll the edge of the nori sheet over the fillings as your middle, ring, and pinky fingers tuck the filling under the edge of the roll, like you would with a burrito. (Check out the technique next time you are at chipotle–they flip the tortilla over the filling and pull/tuck it back into the roll of the tortilla. You are doing the same pull/tuck technique with your fingers!)
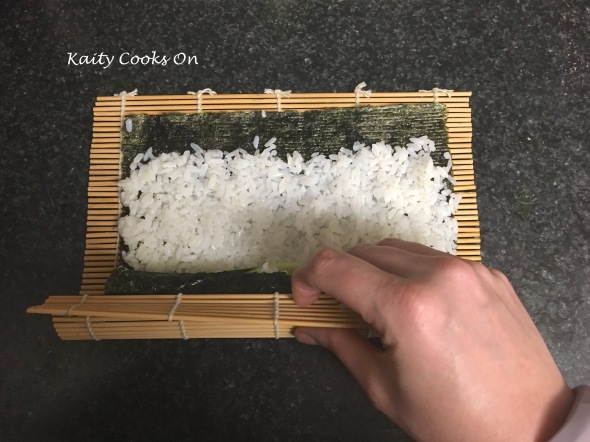
Keep rolling with the mat guiding the nori sheet until the edge of the nori goes entirely around the filling to meet the rice (I’m just lifting the mat to show you).
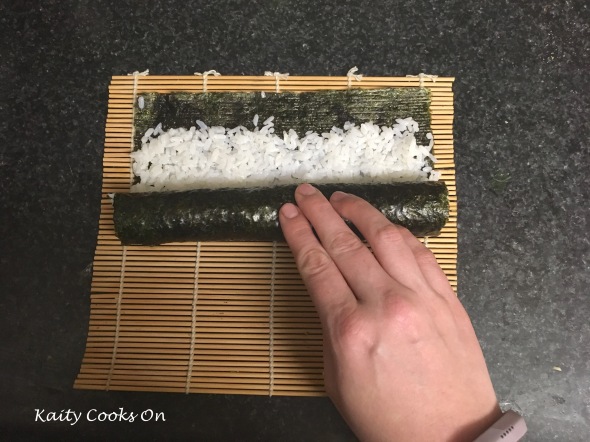
You can release the mat once the filling is encased in the first part of the roll. Keep rolling until the rice is covered and only the edge of the nori remains.
Use a little of the water to liberally wet down the edge of the nori wrap, all the way across.
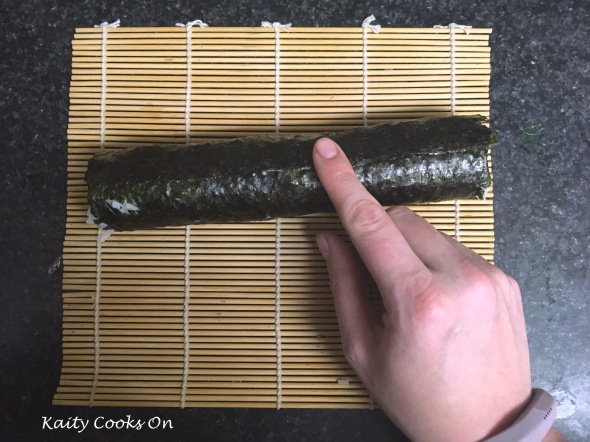
Roll all the way over. The wet nori will stick to the roll. Gently flip the roll over and press down the seam. Place seam side down on the plate and refrigerate for 10-15 minutes.

When you are ready to slice, use a serrated meat or bread knife. Wet the blade before every cut. I usually chop my sushi into eight pieces, as that’s simplest. I’ll cut the roll in half, then line up the two pieces side by side to cut those pieces in half again, and then those four pieces in half one more time.
And there you have it! Homemade sushi!
Weekly Grocery Budget & Meal Plan for Feb 12-18
Posted: February 13, 2017 Filed under: Budgeting, Meal Plan | Tags: budget, grocery budget, meal plan, weekly meal plan Leave a commentI am feeling back on track and excited for my budget planning this week! It has been so eye-opening to truly keep track of my meal planning and shopping for the past few weeks. I was going through the motions before, but not giving myself a chance to sit down and assess my shopping and planning each week. I can already tell that posting my weekly updates here are helping me! In order to stick to the budget, I have started writing the cost of each item on my shopping list as I go, so I can keep a running total to stay under budget. Well, this week, I realized that doing this means I am also starting to gather information to make a general cost list by store–so I know the general price of items and I can snag a deal (or avoid a more costly purchase). For example: I now know that limes are $0.25 a piece at Aldi, so, unless I find them cheaper, I know to wait to purchase the limes there.
This was so helpful for this week, because I went to our local Asian grocery store before Aldi. We needed a few ingredients that I suspected that I could get cheaper there, even cheaper than Aldi. I was able to go back through my shopping lists and have general costs for the items that I knew I wanted from Aldi (I’ve found that dairy, especially, is more expensive at our Asian grocery store) and have the costs for items that I wanted to get at the Asian grocery store. So as I walked into the store, I knew that I should aim to have around $20 left to spend at Aldi and I had prices for almost every individual item, so I could compare the prices to Aldi’s on the fly.
It was a great system! By doing a little math ahead of time and some more while I was in the store, I knew when I had an extra $2 so that I could, say, choose a larger jar of curry paste. This investment will last us through probably 8-10 dishes, so the investment now will definitely pay off later!
M and I decided that we are not going to go out for Valentine’s Day this year. I still have to work a little late, and both of us just don’t feel like dealing with the crowds and reservations. So, I made a little compromise on our budget this week. M insisted that he would be in charge of dinner while I handled dessert, so, while I worked my dessert ingredients into our budget, we will be spending more money for Tuesday’s dinner ingredients (even though we’ve hit our weekly budget). But, as long as we stay well under what we would have spent going out to dinner (not so hard, when you add in a drink each and tip!), we can comfortably cover this splurge.
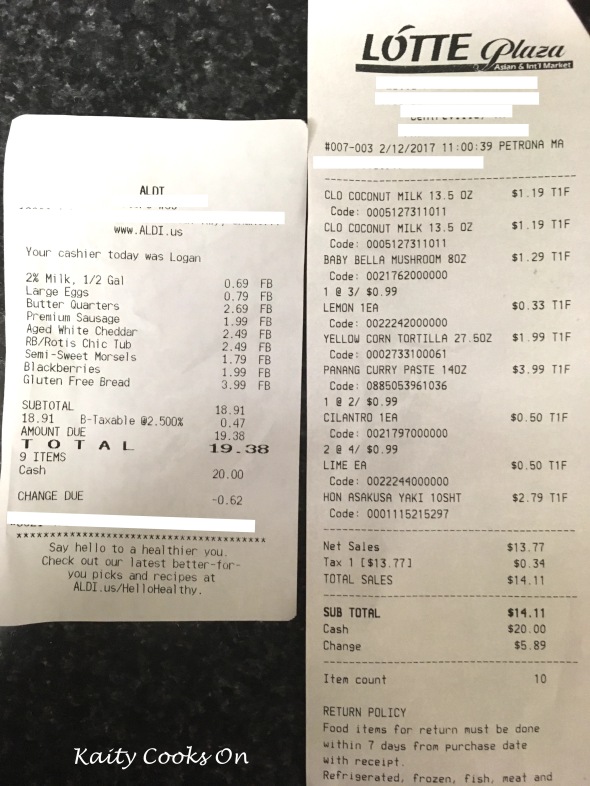
So, here is the breakdown for this week:
- Hungry Harvest Produce Box: $15
- Lotte Asian Grocery Store: $14.11
- Aldi: $19.38
- Total: $48.49
Hmm…looking at that total, I now realize that I would have been able to get fresh raspberries for my dessert. I made do with black berries, as they were about $0.50 cheaper. I suppose that totaling is one more step to add into my math when I shop at multiple stores! Ah well, you live and you learn, huh?
This week’s groceries:
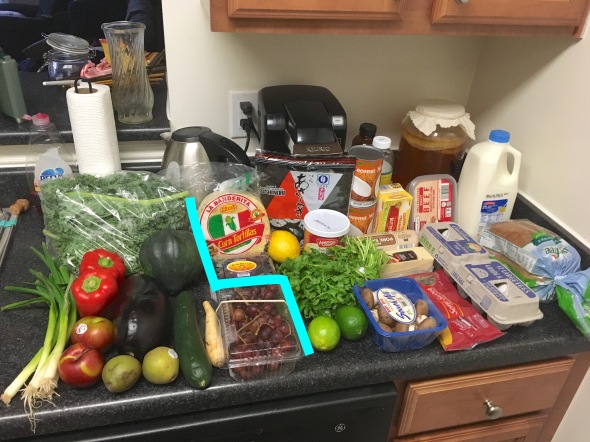
Hungry Harvest Produce Box: green onions, kale, 2 bell peppers, 2 plums, 2 seckel pears (my favorite!), eggplant, acorn squash, cucumber, (1 lonely little) parsnip, 1 lb red grapes
Lotte Asian Grocery Store: corn tortillas, 1 lemon, red curry paste, nori, cilantro, 2 limes, mushrooms, 2 cans coconut milk
Aldi: blackberries, butter, 1 lb. pork sausage, cheddar cheese, chocolate chips, eggs, deli-style roast beef, milk, gluten-free bread
The corn tortillas and nori will last far past this week, as will some of the cheese, coconut milk, milk, butter, curry paste, and acorn squash. I found a super intriguing recipe for acorn squash roasted with onions and served with yogurt. I’m thinking that I will pair that with last week’s frozen spinach for an Indian-inspired dinner next week! I’ll be roasting those red peppers, to keep them longer as well, since I’m only just getting to last week’s pair of green peppers.
Here is what we are eating this week:
Sunday: Swedish Meatballs, Pasta, & Kale Salad I’ll use up some of last week’s sour cream and half-n-half. I’ll also split one of my quarts of bone broth between this gravy and Friday’s soup.
Monday: Teriyaki Salmon, Cucumber Sushi Rolls, & Sesame Broccoli The salmon is from a few weeks back, and the broccoli is from the freezer. The sushi will be a tasty use of the cucumber without loading up on starch and will be easy leftovers for lunch the next day (where as the salmon wouldn’t be…)
Tuesday: Valentine’s Day Dinner (M’s choice) with Flourless Chocolate Cake with Blackberries Yup. Throwing it waaaaay back for dessert. But this cake is so simple, yet so decadent!
Wednesday: Leftovers/Omelet M will be out and I have class until late evening. I’ll make whatever is quick and simple for myself when I get home.
Thursday: Chicken Fajitas With last week’s chicken, peppers, and sour cream, plus we have some salsa stashed in the fridge and the fresh cilantro. Salsa are a great option for adding flavor to a dish, and is an ingredient that will keep for quite some time in the fridge!
Friday: Tom Kha Gai Soup with Rice Here’s where the mushrooms, curry paste, coconut milk, and more cilantro will go! Flexible enough that I can either throw the broth in the crockpot in the morning or heat it up fairly quickly when I get home from work. Creamy, coconut-y, spicy goodness!
Saturday: Spaghetti Squash with Red Sauce and Sausage Because yes, we still haven’t actually gotten to it. Good thing the sauce and sausage are frozen and squashes keep forever. 🙂
Breakfasts will be yogurt and fruit, eggs and toast, or oatmeal. Lunches will be leftovers or sandwiches paired with fruit! If I can get my act together, I’ll make the eggplant into roasted eggplant dip/spread for lunches. If not, then I’ll incorporate it somewhere next week!
Turmeric Lattes (Golden Milk Lattes): 3 Ways
Posted: February 10, 2017 Filed under: Uncategorized | Tags: chai, dairy-free, drinks, gluten-free, latte, turmeric 1 Comment
Alright, confession time. I pronounce (some) words strangely. These days, its only really noticeable in my emphasis on “tt” when it shows up in the middle of words. Kitten. Mitten. Button… But I also said “pint” with a short ‘i’ sound for a little while and went through a phase with too much emphasis on the ‘w’s in words like sword and dwarf. My family will still tease me about it, occasionally. I was a kid who read A LOT (like, a chapter book a day… rereading Harry Potter books 1-3 over 30 times during the year before Goblet of Fire was published…yeah…) So I had a fairly large collection of words that I was most familiar with seeing. So, I tended to pronounce things as the y looked. I mean, obviously there are two T’s for a reason, am I right?

Anyways, I’ve noticed now that I am an adult, I’ve picked up a bad habit of dropping or even changing letters. I think it, again, comes from reading the words so often (on blogs, etc), except that I am a little too lazy and just presume a word instead of actually paying attention. So here’s the actual confession: Even though I have heard it said and I know that the “R” is there…I say too-meric. I also say xanthUM gum, and in my earlier recipes, have often written in with an M instead of an N. That one was more surprising when I realized my mistake. I’ve been aware of my turmeric error forever, but I just can’t seem to shake my bad pronunciation.


Have you tried turmeric lattes (also known as “golden milk” lattes) yet?

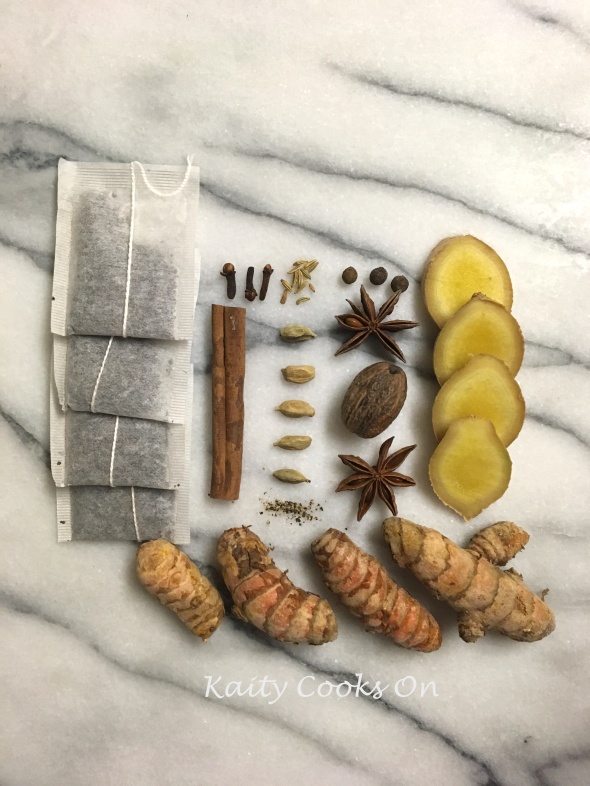
They sounded super comforting when I first heard about them and (no surprise to my spice-loving self) I love them! This is perhaps why I now have a little under a pound of fresh turmeric root in my freezer. That’s another story. But the short version is that it came in my produce box. And my sister also got some and asked me what I did with it. So, I came up with a few different versions of a turmeric latte to share with you today! Plus, it gave me an excuse to make designs with spices on my marble cutting board. Hello, beautiful!
The Quick Way (Turmeric Latte)-–Or when you just have dried, powdered turmeric
- 1/2 tsp. ground turmeric
- 1/4 tsp. ground ginger
- hefty pinch ground black pepper
- 1-2 tsp honey
- 1/4 tsp./a splash of vanilla extract(optional)
- 1 c. milk*
*dairy or non-dairy–I love almond milk in these lattes
Heat the milk in the microwave. In ours, it takes about 2 minutes to get piping hot, but not scalded. While the milk is heating, add all spices, honey, and vanilla extract, if using, to your coffee mug. Mix well to form a paste. Add a splash of hot milk and stir until the paste is incorporated into the liquid. Add remaining milk, give it all a stir, and enjoy!
The Slow Way (Turmeric Tea Concentrate)—Or when you have fresh/frozen turmeric root
- 4 Tbsp. turmeric root, grated
- 1/2 inch slice of ginger root, split into a few pieces
- 3 c. water
- hefty pinch ground black pepper
- 1-2 tsp honey
- 1/4 tsp./a splash of vanilla extract (optional)
- milk of choice
Add grated turmeric root and ginger slices to a small pot with the water. Bring to a boil, turn off heat and allow to steep until water cools (at least 1 hour). If possible, I usually transfer it all to a jar, cover, and let it steep overnight. Strain the water from the roots and keep the concentrate in the fridge for up to two weeks. When ready to serve, heat equal parts turmeric tea and milk of choice. In coffee mug, mix honey, vanilla extract, if using, and ground pepper. Add the milk mixture, stir thoroughly, and enjoy!
The Twist (Turmeric Chai Tea Concentrate)–Or when you don’t want a ton of turmeric
- 2-3 Tbsp turmeric root, grated*
- 3/4 inch of ginger root, sliced
- 5 whole cardamom pods
- 3 whole cloves
- 2 star anise
- 1 cinnamon stick
- 1/4 tsp. fennel seeds
- 3 whole allspice
- hefty pinch of freshly ground nutmeg (or 1/4 tsp. ground)
- 1 tsp. ground black pepper (or a few whole peppercorns)
- 4 black tea bags (regular or decaf, depending on when you favor your lattes)
- 3 c. water
- 1-2 tsp honey
- 1/4 tsp./a splash of vanilla extract (optional)
- milk of choice
*or 1-2 tsp ground, dried turmeric
Add grated turmeric root, ginger slices, and all spices (whole or ground) to a small pot with the water. Bring to a boil, turn off heat and allow to steep until water cools (at least 1 hour). If possible, I usually transfer it all to a jar, cover, and let it steep overnight. Strain the water from the spices and keep the concentrate in the fridge for up to two weeks. When ready to serve, heat equal parts turmeric tea and milk of choice (usually 1/2 cup of each). In coffee mug, mix honey and vanilla extract, if using. Add the milk mixture, stir thoroughly, and enjoy!
Weekly Grocery Budget Update Feb 4-11
Posted: February 7, 2017 Filed under: Budgeting, Meal Plan | Tags: cheap eats, gluten-free, groceries, grocery budget, meal plan Leave a commentHere we are again, checking out my weekly grocery budget. I did pretty well for week 3. I’ll admit, I wasn’t feeling very enthused about meal-planning this week. Our produce box had a lot of items, but not very interesting ones. When everything was plotted out in my meal plan, there wasn’t too much to buy, so I could use some of this week’s budget on stock-up items. We also need to eat down our freezer a little, so I am trying to pull bits and pieces from that stock for the next few weeks.
In addition to eating more fish, I also want us to incorporate more bone broth into our diets. I’m trying to have soup every week–an easy use of the bone broth and (usually) quite a cheap option for dinner! I am recent(ish) soup convert. It was never something I enjoyed growing up, until around high school when I made myself learn to like tomato basil soup. Some of my favorite kinds have already graced this blog: tomato basil, French onion, Italian Peasant soup, Pot Pie soup… I am excited to try a couple of new ideas in the coming weeks, as well!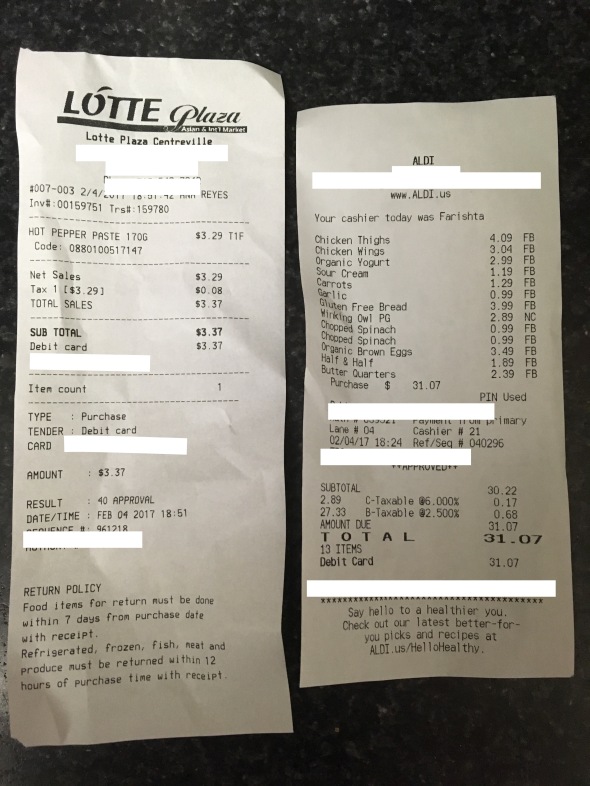
I did very well shopping this week (and remembered my receipts!) Nothing beyond our usual produce box, so that clocked in at $15. I had to go to our local Asian grocery store to grab the gochujang, but that, along with my Aldi purchases, came out to $34.44! So here is this week’s breakdown of our $49.44 grocery haul:
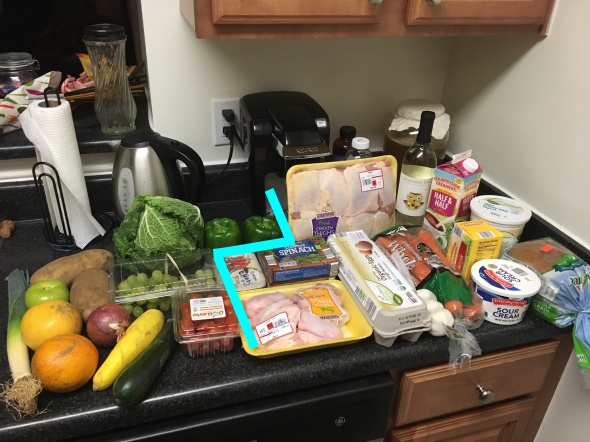
Hungry Harvest Produce Box: 1 leek, 1 orange, 1 grapefruit, 1 “yellow” tomato, 2 (large) potatoes, red onion, 1 yellow squash, 1 zucchini, 1/2 lb grapes, 1 pint cherry tomatoes, 1 cabbage, 2 bell peppers
Aldi: 1.5 lb chicken wings, 4.25 lb bone-in, skin-on chicken thighs (bones & skin will be saved up for the next batch of bone broth!), 2 packages of frozen spinach, eggs (my mother is out of town this week–none from her coworker), garlic, 2 lb carrots, white wine (for cooking & occasional drinking), half & half, butter, plain yogurt, sour cream, and gluten-free bread
Other: gochujang (Korean hot pepper paste) from the Asian grocery store
I think it’s so interesting to see how my $35 goes each week. This is pitiful compared to the first week, when most was fruit and veg. It does go to show just how expensive animal products, be it meat or dairy or eggs, are and how quickly they add up! Thankfully, these will all stretch for a few weeks!
The only items that will be entirely used up this week are the leek, potatoes, cabbage, fruit, chicken wings, and maybe bread–depending on how many sandwiches we go through. I am not touching the tomatoes, squash/zucchini, peppers, chicken thighs, spinach, or half & half, but I will use them next week! I see creamed spinach, swedish meatballs, and my (hidden veggie) surprise muffins on the horizon.
Here is this week’s meal plan:
Sunday: Honey-Sriracha Wings & Jalapeño Popper Dip (And Rocky Road Brownies) We stayed home, but I still wanted the Super Bowl snack food! I’m currently obsessed with these wings–I shared the recipe on instagram. I also realized that I could cobble together a jalapeño popper dip from the bits of cream cheese & cheddar cheese in our fridge, plus a few of our home-grown jalapeños from the freezer! I wanted a little dessert too, and brownies are one of the most pantry-friendly desserts out there.
Monday: Loaded Potato, Leek, & Cauliflower Soup Here is the rest of last week’s cauliflower! Simmer in broth with the potatoes and leeks from this week’s produce box, then blended up with a little milk and the last of our cream. I topped mine with a little sour cream, cheese, crumbled bacon, and chopped scallions. Plus, there’s enough leftovers to last for several lunches!
Tuesday: Leftovers I work late. M is out. I’m sure there will be soup waiting for me.
Wednesday: Stuffed Acorn Squash M is cooking while I go to class. We have acorn squash left from boxes from weeks ago, that he’s stuffing with rice, vegetables, maybe some sausage, and other odds and ends from the fridge.
Thursday: Out I’m out with friends. M can do leftovers or something quick for himself.
Friday: Cheeseburgers with cole slaw and sweet potato fries Those hamburger buns are taking up valuable freezer space! This dish will use up the cabbage and some carrots in the slaw, with sweet potatoes from last week, and ground beef from the freezer.
Saturday: Pasta or Spaghetti Squash Keeping things simple after my long day at work!
Breakfasts: eggs, yogurt & fruit, toast, or oatmeal
Lunches: Leftovers or sandwiches with more fruit
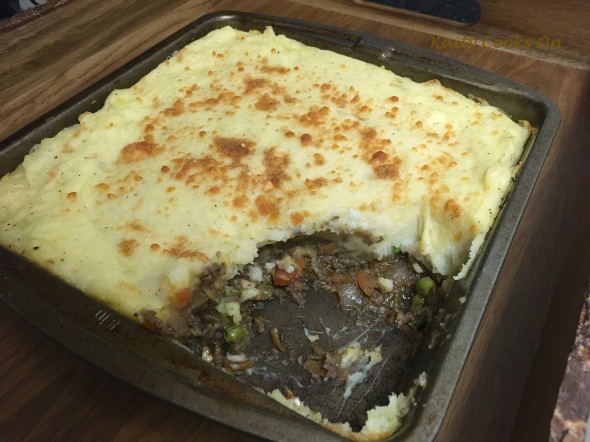
Updated Shepherd’s Pie
Posted: February 2, 2017 Filed under: Uncategorized | Tags: Dinner, gluten-free, ground beef, Lunch, potatoes, shepherd's pie 1 Comment
We got our first snow of the year this week! Just a dusting, but enough to make for a white morning. It’s cold, but dry enough, so it doesn’t feel like that bitter, seeping chill. Our winter has, otherwise, been fairly warm, so I’ll take it! All through the fall, winter, and early spring, Shepherd’s Pie is in my rotation at least a few times each month. It is one of a few select dishes that M and I will eat the leftovers with as much gusto as the fresh serving. (Given that my lunches are alway leftovers, I relish when a dish is just as good the day after.) Also, this recipe usually gives us between 6-8 servings, so it packs a real punch in my weekly meal plans. Better yet, it’s not too hard to double the recipe and it freezes well. (Just thaw for 24 hours/overnight before reheating!) Plus, I have successfully replaced half of the ground meat with finely chopped mushrooms and/or cooked lentils to great success. Tasty? Check. Reliable? Check! Cheap? Check!

I’ve been making Shepherd’s Pie from memory for several years now, though I shared my recipe, here, a long time ago. When M and I were planning for our trip to the beach house this year, we decided to make Shepherd’s Pie on our dinner shift. I was totally surprised to find that I had organically adjusted from my original recipe without even noticing. So here is how I make Shepherd’s pie now, in 2017. As my friend pointed out, the big difference that makes this dish so good is that equal effort is put into seasoning and flavoring the potato topping as well as the meat, keeping the whole thing in balance and making every bite delicious! (And in case you were wondering, it is pretty simple to multiply this recipe by 6, in order to feed 25 hungry people at once–just make sure you have big pans!)
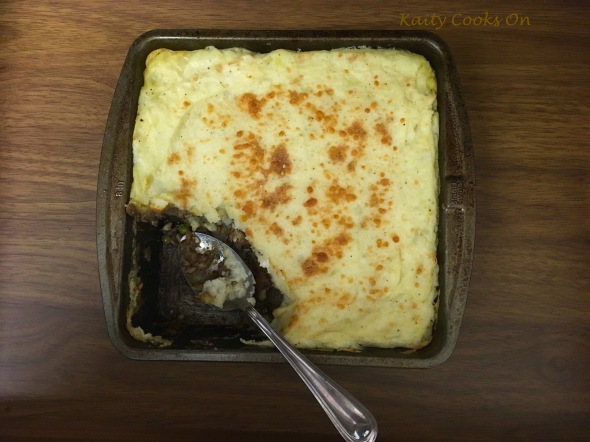
Shepherd’s Pie
Serves: 6-8 | Prep time: 20 min. | Cook time: 30-40 min
For the Topping:
- 1-1.5 lb potatoes (russets are ideal)
- 4 Tbsp heavy cream
- 3 Tbsp butter
- 1+ tsp salt
- 1/2 tsp. black pepper
- 1 clove garlic, finely minced or grated
- fresh chives, optional
- 1/4 c. grated parmesan cheese + more for sprinkling
For the Filling:
- -1 lb ground beef or ground lamb
- -Olive oil (about 2 Tbsp/enough to coat the pan)
- -1 large/2 medium carrot(s), finely chopped
- -1 large yellow or white onion, finely diced
- -1 Tbsp fresh rosemary, minced (or 2 tsp dried)
- -1 Tbsp fresh thyme, minced (or 2 tsp dried)
- -2 garlic cloves, minced (I love garlic, you can use less, to your taste)
- -3 Tbsp Worcestershire Sauce
- -3-4 Tbsp Ketchup
- -1/4 c red wine (I used a cabernet we had lying around)
- -1/4 c chicken or beef broth/stock
- -3/4 c. frozen green peas
- salt & pepper
Start the potatoes:
Preheat the oven to 425 degrees Fahrenheit. Peel the potatoes and cut into cubes. Place in a pot and cover with water an inch above the potatoes. Bring to a boil over medium heat and cook for 10-15 minutes until the potatoes are easily pierced by a fork. Remove from heat and set aside.
Make the filling:
While the potatoes are cooking, add the oil to a hot pan, then add the chopped carrots and onions. Sauté over medium-high for about five minutes, until the vegetables begin to soften, then add in the ground meat*. Cook, stirring often to break up the minced meat. Drain the fat if necessary. Add the minced garlic, rosemary, and thyme and cook for 1-2 minutes more until the garlic is fragrant. Add the Worcestershire sauce and ketchup, stirring well to coat the entire mixture. Then add the wine, broth, and peas. Turn the heat down to medium-low and allow the mixture to simmer while mashing the potatoes.
Make the potato topping:
Drain the potatoes and add in the remaining ingredients. Mash together into one smooth mixture. Taste and add more salt or pepper, if needed.
Finish Up:
By now, the liquid in your meat mixture should have reduced some. In a well-oiled dish, layer first the meat mixture, then the potato topping. Sprinkle with additional parmesan cheese and bake in the oven for 10-15 minutes, until the cheese is golden.
*If replacing half the meat: With mushrooms–add to the carrots and onions for the beginning, allowing the mushrooms to cook down before adding the meat. With cooked lentils: add after all the meat has browned.