Budget Update & Meal Plan for March 26-April 1
Posted: March 26, 2017 Filed under: Budgeting, Meal Plan, Non-recipe | Tags: Dinner, gluten-free, grocery budget, meal plan Leave a commentThis is the first week in my long stretch of tech weeks/internship weeks that will have me getting home later and be major shifts in my usual schedule. I’m planning to do a lot more meals in the slow cooker, and also batch cook when I can–for instance, I cooked up twice the amount of chicken thighs when I was making Coq Au Vin last Friday. While half the batch stewed in the wine sauce, I just set the rest in a skillet, cooking plain. Without much extra effort, I had cooked chicken for our Caesar Salads last night and I still have some cooked chicken for tonight’s quesadillas. It makes dinner comes together in a matter of minutes! These next few weeks are going to be focused on simple, quick dinners that can give us lots of lunch leftovers.
I am also recognizing that simple, but flavorful might mean relying on some more prepared ingredients, like the beans in tomato sauce on this week’s plan. I could have made a sauce and added beans and simmered and all that…or I can open a can and heat the contents for an equally tasty dinner. It’s all about keeping the balance. Sometimes, that balance requires a little compromise in the form of extra cost, but, thankfully, not this week! I was delighted to be able to fit a serious stock-up into this week’s budget. Getting most of our groceries from our local asian market allowed me to keep the extra few dollars to get tamarin, rice vinegar, and sesame oil! Just like dairy products, all of my specialty sauces seem to run out at the same time. These ingredients are easy to stretch and asian dishes are usually easy and quick to cook! I expect to see a lot of wok-ed stir fries, curries, and noodles on our meal plans for the next couple of weeks. I also was able to grab a package of rice noodles, although we won’t even touch them this week. Several other items, like the sour cream, cheese, onions, and sausage will even stretch into next week as well.
On Monday, we are seeing my mother and sister while M tries out his Bulgogi recipe. Since we are feeding 5 people, we allowed a portion of the meal to come out of another budget. We have rice in the pantry, and I included most of the accompanying vegetables and sauce ingredients into our normal $50 budget, but the meat will be paid for through our ‘splurge’ fund. Also, Saturday is an extra long day. I’ll know that I will be out and about at dinnertime. We should have enough leftovers for me to bring, or I should be able to make a sandwich as well, but I may just pick up food along the way.
I’m excited to use a few new products this week: most specifically those Giant Baked Beans. The last time that I was in Trader Joe’s, they actually had a truly gluten-free sample: these beans paired with sausage. It was delicious and I’m excited to recreate it at home. I love cassoulet-type dishes, with sausage and beans, and I think it will be a perfect scoop on top of polenta! When on a budget, grains/carb-y stretches like potatoes are a necessity, in order to keep meals affordable, yet filling. I’m doing my best to keep our carb sources varied, hence the addition of polenta. We are also on a serious tofu kick around here. I finally found an extra-firm variety at our asian market, so that saved me about $0.80 off of purchasing it from Trader Joe’s or Giant (my Aldi still does not carry tofu).
Here is how we spent this week:
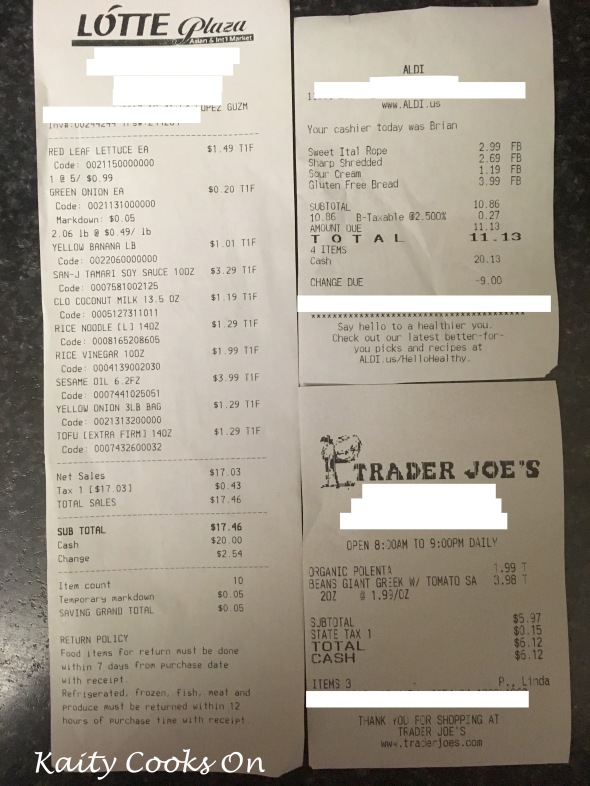
Hungry Harvest Produce Box: $15.00
Lotte Asian Market: $17.46
Aldi: $11.13
Trader Joe’s: $6.12
Total: $49.71
Here’s what we got:

Hungry Harvest Box: 2 ears corn, broccoli, 1 red onion, 2 (small) avocados, 2 apples, 3 yellow squash, 2 peppers, 1/2 lb kale
Lotte Asian Market: red lettuce, coconut milk, green onions, 3 lbs onions, sesame oil, tamarin, rice vinegar, rice noodles, bananas, tofu
Aldi: cheddar cheese, italian sausage, gluten-free bread, sour cream
Trader Joe’s: polenta, 2 cans Giant Baked Beans
And here’s how we’ll use it:
Sunday: Chicken & Roasted Veggie Quesadillas with Corn Salad and Mango using some chicken thighs from last week, plus one of the peppers and one of the onions and some of the broccoli, chopped up with the cheese in tortillas from the pantry. We have the sour cream for topping. I’ll use last week’s tomatoes and this week’s corn and a little onion in a salad with a basic pantry vinaigrette, plus we have last week’s mango as a sweet finish to the meal.
Monday: Bulgogi with Rice & Lettuce Wraps We’ll be at my mom’s, as I mentioned. We’ll bring the lettuce and green onions, and use the asian sauces + onions in the marinade on Monday morning.
Tuesday: Sausage and Giant Beans in Tomato Sauce over Polenta, with Kale Salad as mentioned, some of the sausage and all of the beans will be a topping for seared polenta rounds. I’ll also make our favorite kale salad with another basic pantry vinaigrette, with some bread crumbs, and some parmesan, dried cranberries, and sliced almonds from the pantry.
Wednesday: Veggie + Tofu Curry and Rice using up the rest of the broccoli, pepper, and yellow squash, along with some onions, the tofu, the coconut milk and some rice and curry paste from the pantry.
Thursday: Citrus-Braised Pork Tacos with Slaw using some reserved, pre-cooked pork from the freezer. I saved some when I made Chilaquiles a few weeks ago, so I’ll pickle some of that red onion for serving, along with the avocados and some tortillas from the pantry. Again, I’ll use some pantry ingredients to make up a dressing for the rest of last week’s cabbage, to make a cole slaw.
Friday: Leftovers using up whatever remains from the week!
Saturday: Leftovers/Out
Breakfasts will be eggs+toast, yogurt+granola+fruit, or peanut butter & banana smoothies. Lunches are mostly leftovers or sandwiches.
Homemade Granola: Your Way
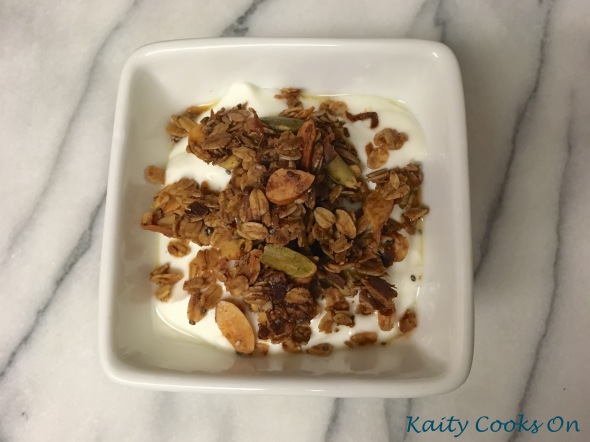
Posted: March 23, 2017 Filed under: Helpful Hints, Recipes | Tags: breakfast, gluten-free, granola, homemade, snacks Leave a comment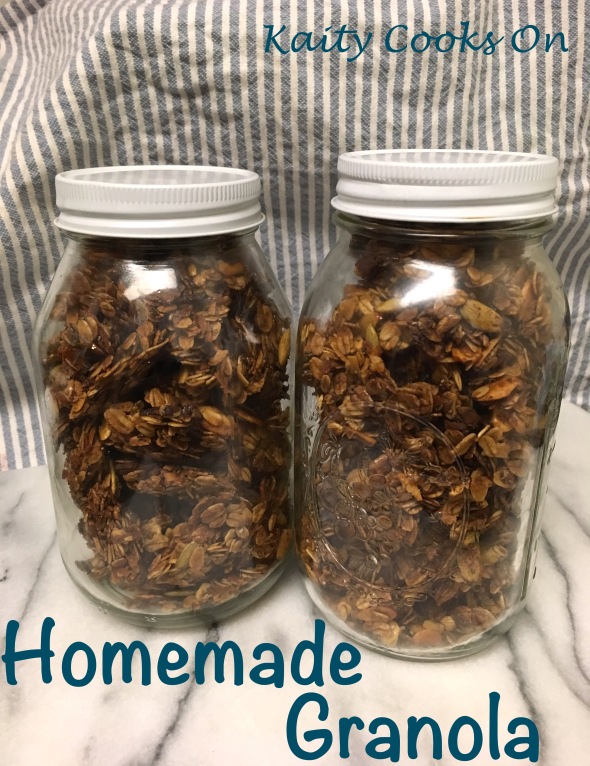 I mentioned in my last meal-plan post that I was planning to make a batch of granola for my breakfasts this week. Granola is one of those items where I almost always have the ingredients on hand, without even trying, as it’s super flexible and made entirely of pantry staples. It is also one of those items that I forgot how much I enjoy it until it in right in front of me, on the spoon, on it’s way to my mouth. I love granola! I prefer it over yogurt or treated like cereal, in a bowl with milk, but when you make it at home, you control how large/small the clusters of granola are, so you can keep the clusters large and take the granola on the go, dry, for a crunchy snack.
I also was thinking (though I’m sure that I am not the first), that it wouldn’t be to hard to swing granola’s flavors into a savory-sweet option too. Curry, rosemary, spicy–it would make an awesome topping to salads or a “savory” yogurt (I’ll admit, I still haven’t tried those…and I’m a little hesitant) or even as an accompaniment to a cheese board!
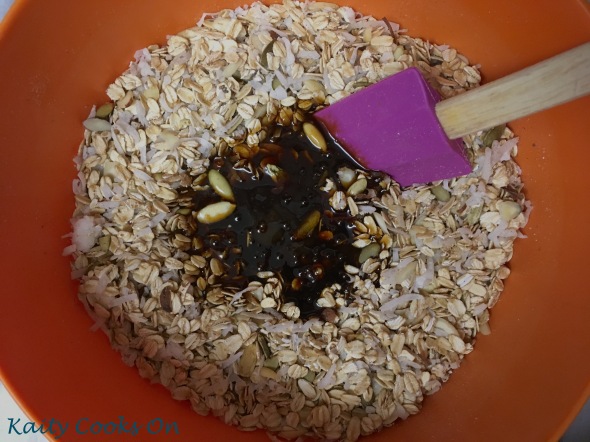
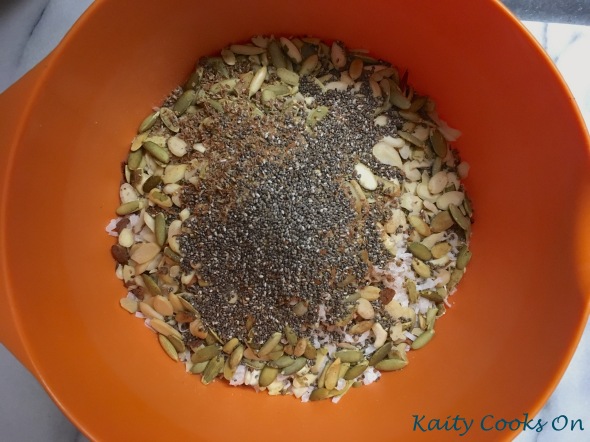
As I said, granola is super-customizable, but it is also very easy. Just think of it as a ratio! My basic ratio is: for every 1 cup of (gluten-free) oats, I have 1/3 cup (total) of mix-ins, 2 tablespoons of fat and 2 tablespoons of liquid sweetener. I like to bump up my omega’s too, so I bargain for 2 teaspoons apiece of chia seed and flax seed. With the variety of mix-ins, fats, sweeteners, and spices, the granola possibilities really are endless! Here are some ideas for each:
My granola looks extra dark because of the molasses–it’s not burnt!
Customizable Granola!
Be sure to use oats that are certified and labeled “gluten-free”–otherwise you risk cross-contamination. Combine up to two different fats and two different sweeteners (just be sure the total volume remains the same) for extra depth of flavor!
1 cup GF rolled oats, plus:
Fats (2 TBSP per 1 c oats):
- melted butter
- melted coconut oil
- olive oil
- avocado oil
- safflower oil
- 1/2 nut butter + 1/2 fat choice above
Liquid Sweeteners(2 TBSP per 1 c oats):
- maple syrup
- molasses
- Lyle’s golden syrup
- honey
- agave nectar
Mix-ins(1/3 c total per 1 c oats):
- Nuts (almonds, peanuts, walnuts, pecans, hazelnuts, cashews, brazil nuts, macadamias…)
- Seeds (sunflower, pumpkin, squash, sesame, poppy seeds, millet…)
- Dried fruits (cranberries, raisins, blueberries, chopped apricots, cherries, figs, goji berries…)
- Other (dried shredded/flaked coconut, chocolate chips, cocoa nibs, crystallized ginger…)
Plus 2 tsp chia seeds and 2 tsp ground flaxseed and about 1/2 tsp each of spices (cinnamon, cardamom, ginger, clove, nutmeg, chili, etc), with a pinch of salt and a dash of extract (vanilla, cinnamon, lemon, etc) with 1 cup of rolled gluten-free oats.
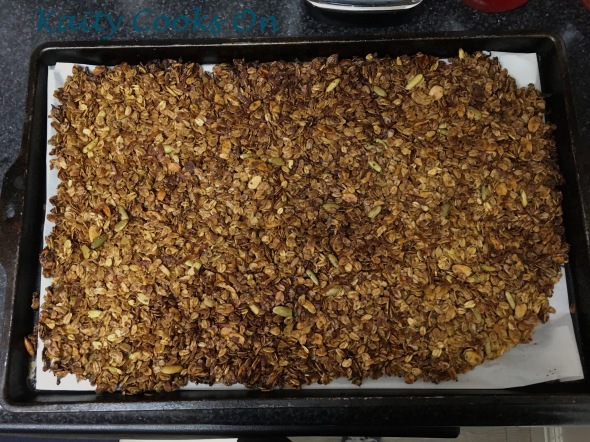
My batch that is in the photos above a larger triple batch. I just multiplied it all (roughly) by three!

Pantry Clear-out Coconut-Almond Granola
Serves: 10-12 | Prep time: 10 minutes | Cook time: 25-30 minutes
- 3 c rolled oats, raw
- 1/3 c. pumpkin seeds
- 1/3 c. sliced almonds
- 1/3 c. shredded coconut
- 2 Tbsp. ground flax seeds
- 2 Tbsp. chia seeds
- 2 tsp. ground cinnamon
- 2 tsp. ground cardamom
- 6 Tbsp. melted butter
- 3 Tbsp. Lyle’s golden syrup
- 3 Tbsp. molasses
- 1 tsp. vanilla extract
- big pinch salt
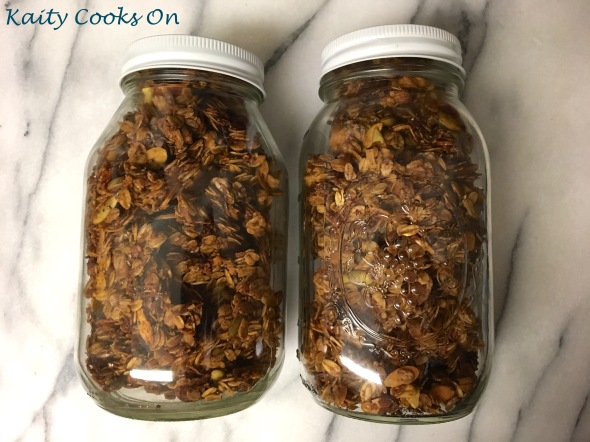
Preheat the oven to 350 degrees F. Line a large baking sheet with parchment paper. Lightly spray with cooking oil. Add the oats, mix-ins, spices, and other dry ingredients to a large bowl. Mix until combined. Stir together the melted butter, golden syrup, molasses, vanilla extract, and salt until combined. It may take a minute or two for the fat to mix into the liquid sweeteners. Add the liquid to the dry ingredients and stir until all of the dry ingredients are coated. Spread into a thin layer on the lined baking sheet and baked for 25-30 minutes. Remove the granola from oven and allow to cool completely on the pan without disturbance. This will allow the granola to stick to together. Gently lift an edge of the granola–it will begin to break into pieces. Stir and crumble until clusters reach desired size. Store is a tightly closed container at room temperature for up to 10 days.
Budget Update & Meal Plan for March 19-25
Posted: March 20, 2017 Filed under: Budgeting, Meal Plan | Tags: Budgeting, cheap eats, Dinner, gluten-free, grocery budget, meal plan, saving money Leave a commentI’ve gotten so much more careful with my food use since I started holding us to this tight budget. I’m trying to be clever and creative so that all leftovers get eaten and every food item is stretched to provide the most sustenance for us. This makes it much more upsetting when I encounter a crack in my plans…like when the last of the milk has gone sour, right on the day I was meant to use it up in cornbread muffins. 😦 Thankfully, I had enough sour cream, half-in-half, and–yes–water to make up for the milk in the recipe. But it was still disappointing. I knew it was nearing it’s turning point, and I purposefully moved the muffins up in my meal plan in order to use up the milk before it soured. But my timing was still off.
As I said, I did still manage to make corn muffins, so not too much is lost, except for a little milk down the drain. But it is interesting to see my thought process and values changing as we adjust to this new budget. I’m accepting almost everything that is offered to me. I’m certainly not begging, but I find myself taking advantage when I can. My mom’s been collecting pieces in Safeway’s monopoly game, and she has handed a few of the “free item” coupons over to me when she doesn’t plan to use them. I got a free avocado a few weeks ago and a box of English Breakfast Tea today. Even though they are minor, it’s a nice little treat to get something that I wasn’t able to fit into the budget. We aren’t eating poorly, or even boringly, but it’s nice to have an unexpected item to round out my meal plans every once in a while.
Officially, we don’t really have to follow this budget anymore. I started this strict budget this year because I was feeling the pressure from a new medical bill. My tax return this year was enough to cover it and, as of today, it is paid off in full. But, I think I will stick to the plan for a while longer. If I used to average about $70 per grocery trip last year, I should free up almost $100 a month as I continue to follow this budget. It will be nice to properly and methodically save for some short-term goals, and I intend to do just that! So, our $50 weekly budget will continue. I think the smaller amount of money we can adjust to living on, the better.
I have to admit, I am still torn on bread. It is tough to see almost 1/7 of my spending money go towards a loaf almost every week ($4 seems like an awful lot when you are only working with $35). I tried to get into the routine of gluten-free sourdough, with which I had moderate success. But it eats up so much flour in order to strengthen the starter, and we don’t have quite enough time, nor eat enough baked goods to eat up the discard starter. So it felt very wasteful, in flour and in money. My non-sourdough loaves are nice for a change of pace, but don’t make for good sandwich bread (which is where most of the store-bought goes each week: into M’s lunchbox). So for now, it is a price I have to adjust to, and one of the facts we have to live with, being gluten-intolerant. The quality and price of gluten-free products is so much better than it used to be, but it is something that I have to contend with each week. Thankfully, I’ve mostly forgotten how gluten-full products and prices compare. So as long as I avoid looking at those prices, it doesn’t get to me very much!
Here is my spending this week:
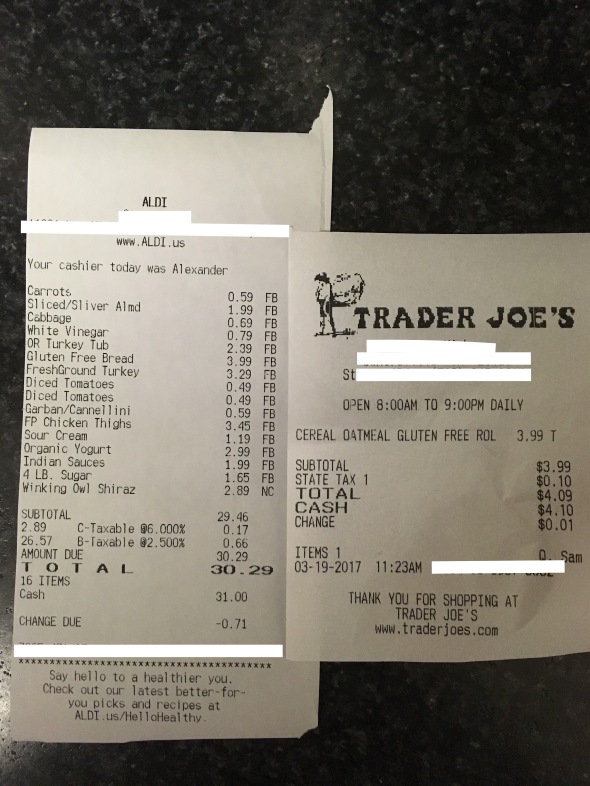
Hungry Harvest Box: $15.00
Aldi: $30.29
Trader Joe’s: $3.99
Total: $49.28
Here’s what we got:

(It looks like a lot this week.)
Hungry Harvest Produce Box: 1 pint grape tomatoes, 1 head (local!) lettuce, 2 bell peppers, 1 lb red potatoes, 1 mango, 4 plums, 2 pears, 1/2 bunch green onions, 4 apples*, and 5 oranges*
*We requested not to get the eggplant this week and the apples AND the oranges were substituted in for it! Makes me wonder how big that eggplant was, in order to equal 9 pieces of fruit?!
Aldi: 1.2 lb ground turkey, 5 lb chicken thighs ($0.69 per pound!), yogurt, sour cream, turkey lunch meat, white vinegar, cabbage, sliced almonds, white sugar, gluten-free bread, 2 lb carrots, red wine, 2 cans dice tomatoes, korma simmer sauce, and 1 can of chickpeas
Trader Joe’s: gluten-free rolled oats
And here is how we are eating this week:
Sunday: Turkey Chili + Cornbread Muffins Turkey was cheaper than beef, so it will get a splash of worchestershire sauce to deepen the flavor, plus onion, diced tomatoes, carrots, and bell pepper. I found a packet of GF chili seasoning in the pantry, which I use along with a little hot sauce to kick things up. One the day we moved into our apartment, M’s mum made a big crockpot of chili for everyone, with chickpeas and fresh tomatoes. It was SO GOOD (probably because we had just moved an entire apartment’s worth of furniture in a snowstorm), so I am adding the chickpeas to call back to that. The cornbread muffins were primarily a way to use up our milk, but, as mentioned, plans had to change. Thankfully, Aldi only has 16 oz sour creams, so I had enough to put into the muffins and still have enough for a dollop on the chili when serving.
Monday: Singapore Street Noodles with Tofu using the rest of last week’s tofu, along with some peppers, cabbage, carrots, and green onions. This is the last of our stockpile of rice noodles from the pantry, and we still have plenty of sauce ingredients (tamari, etc) in the fridge.
Tuesday: Leftovers M’s out. More chili for me!
Wednesday: Crockpot Chicken Korma with Rice using the rest of last week’s fingerling potatoes, the rest of the bell peppers, some carrots and chicken. I could have saved about $0.20 by getting a can of coconut milk and making the sauce myself with spices from the pantry, but I decided that my time was worth the $0.20 and grabbed this jar of pre-made korma sauce.
Thursday: Coq Au Vin with Mashed Red Potatoes I love Tieghen’s recipe, though I’m not putting that much butter into my potatoes this time around. I’ll use the last of the sweet potatoes from a few weeks ago.
Friday: Chicken Caesar Salad I’m slightly risking the green lettuce by waiting until Friday, but this is the perfect simple dinner to whip up after my longer class. Parmesan from last week and dressing from a few weeks ago.
Saturday: Leftovers/Pasta Whatever is scrounge-able!
I’m making a big batch of homemade granola and I’m saving the liquid from the chickpeas to try my hand at aquafaba meringues for the first time. Wish me luck!
Breakfasts will be granola+yogurt+fruit or eggs+fruit. Lunches are leftovers or sandwiches, along with more fruit and cucumbers left over from last week. The sugar and vinegar is for my home-brewed kombucha, which is giving us about 80 oz a week for the cost of a couple teabags, a cup of sugar, and a few tablespoons of vinegar!
Simple Roast Chicken
Posted: March 16, 2017 Filed under: Budgeting, Recipes | Tags: 5 ingredients or less, chicken, Dinner, gluten-free, roast, sunday supper 1 Comment We finally got our snow day on Tuesday, and I think it’s thrown off my whole week. Monday was spent preparing for the storm (our work is tied heavily to the schools, so when they close, we are left with a lot of rescheduling) and then I feel like all of Wednesday was spent trying to get back into the groove. But I did enjoy the day off! It finally gave me a chance to mix up some homemade house cleaning and hair/skincare supplies. I pulled most of my “recipes” from The Hand’s On Home, with which I am only slightly obsessed. All of the various preserved recipes look amazing! Considering that I’ve have breathing trouble the last few times that I’ve cleaned our bathroom (hello childhood asthma) I have really, really wanted to mix up a few sprays and scrubs made from gentler ingredients. I now have a “grime spray” for the kitchen that is already working wonders on our glass stovetop, along with an all-purpose cleaning spray, a scrub for tougher stains, and an acidic spray to cut through soap scum. I’m definitely willing to put in a little more elbow work if it means having the ability to breathe, so we’ll see how it goes!
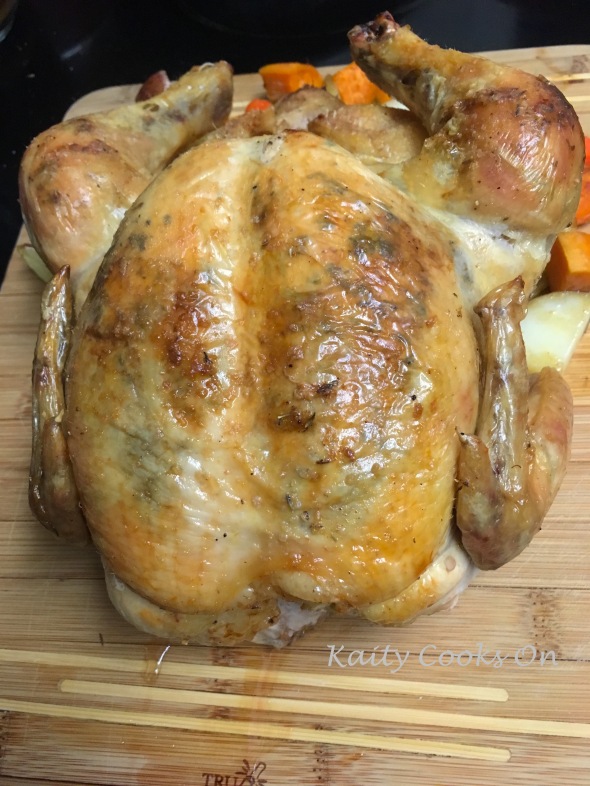
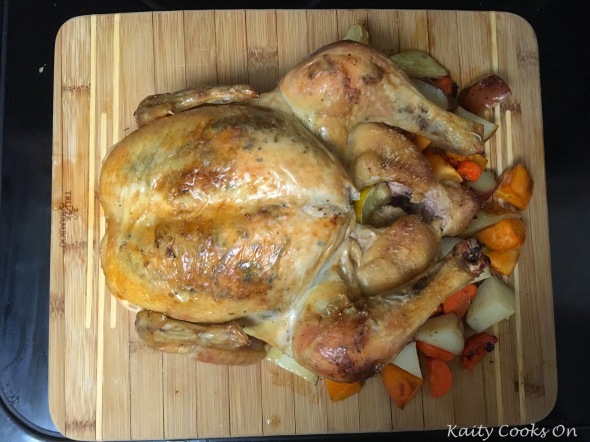
Last week, a roast chicken was the focal point of my meal plan, with the meat going into another two dishes after the initial roasting night, plus the bones providing the base for several quarts of bone broth. Now, I do realize that roast chicken recipes are a dime a dozen and range from “super” simple to the most complicated mix of flipping and brining and rubbing and soaking, all in order to get a nice golden bird with crispy skin and juicy meat. Roasting a chicken was a little intimidating when I first tried it a few years ago, mostly just for the dense amount of conflicting information that I encountered. I’ve honed my method of choice over the past few years, and I wanted to finally share it here. Yes, it does involve a flip or two, but it only requires 5 ingredients (not including salt and pepper) and, in spite of the flip, is mostly hands off during the roasting time!


I’ve also included the most basic instructions for a drippings-based gravy, plus noted where I add in vegetables, when I decide to make those as well. I’m certain you’ve already heard how well a roast chicken can be used when meal-planning and/or early frugally. It can easily provide the protein for 3 meals, plus creating the base for a fourth meal if you make the bone broth. A rotisserie chicken certainly saves time and effort, and can usually be grabbed for $5. But, I’ve yet to encounter a rotisserie chicken that is clearly marked as being gluten-free. Plus, I’ve found most rotisserie chicken’s clock in at about 3 pounds. I’ll just note that my 5+ pounder was $5.05 and I can be absolutely certain that it is safe for me to eat. That being said, if anyone has a reliable source for GF rotisserie chicken, let me know. Because on some nights, my not having to do anything at all would totally be worth the extra dollar or two!
Roast Chicken
Serves: 6+ | Prep time: 15 minutes | Cook time: 1.5-2 hours
- 1 whole chicken, 5-6 lbs
- 1 lemon
- 2 Tbsp butter, softened
- 1 tsp dried thyme leaves
- 1 clove garlic, minced
- 1 tsp salt
- 1/2 tsp ground pepper
Place a metal cooling rack in a higher-walled baking dish (or use a roasting pan, if you have one). Preheat the oven to 425 degrees F. Mix together the butter, thyme leaves, garlic, and a pinch each of salt and pepper.
It is likely that your chicken still has the giblets and neck within the cavity. Make sure to remove those. You can simmer these in a small covered pot filled with water while the chicken roasts, to create a basic broth to use to make gravy for the chicken (if gravy is your thing–it certainly is a necessity in this house!) Pat the chicken dry all over, including inside the cavity. Cut the lemon into quarters and place within the cavity of the chicken. Place the chicken in the pan, breast side up.
Now we want to get the butter underneath the skin of the chicken. The butter will help to keep the meat from drying out and help to keep the skin crispy. Win-win! Starting at the tail end of the chicken, you should be able to pull up the skin away from the meat. You might have a little resistance, but it should pull away. (Cue me trying not to get too technical, for those who may be a little squeamish!) Use a spoon (or honestly, your fingers) to spread the butter over the breast meat, beneath the skin. You should be able to poke through the dividing layer to get between the skin and the leg meat, too. Add a little butter there as well. Certainly can’t hurt! Sprinkle the rest of the salt and pepper over the outside of the chicken. Truss the chicken. I tried this method for the first time and was quite pleased with it. It definitely keeps the skin from shrinking!
Place the chicken in the oven and cook for 15 minutes, to start the initial browning of the skin. Remove the chicken from the oven and turn the heat down to 350 degrees F. Flip the chicken upside down, so that the breasts are down in the pan (I found it easiest to use tongs). Place back in the oven and continue to cook. You should bargain for 20 minutes per pound (So a 5-lb chicken should cook for 1 hour and 40 minutes. A 6-lb chicken should cook for 2 hours.) Make sure you do the math and set a timer! 🙂 If you want to add any vegetables to roast alongside your chicken, I like to give the chicken a headstart by about 30-40 minutes (if the roasting time is 90+ minutes), then add the chopped veggies into the pan around the chicken for the remainder of the roasting time. Once the time is up, remove the chicken from the oven and use the tongs to flip breast-side-up. Check that the temperature at the thickest part of the thigh has reached 160 degrees (it will raise to 165 degrees while it rests.) If the skin is a little pale, go ahead and broil for a minute or two. Just be sure to keep an eye on it! After broiling (or not), pull the chicken out of the oven and allow it to rest for 10-15 minutes.
While the chicken is resting, you can make gravy. Spoon a tablespoon or two from the drippings at the bottom of the roasting pan into a large skillet over medium heat. Add a spoonful or two of flour until it makes a roux. Let this cook, stirring frequently, until the roux turns a light brown. Add a little broth (from a carton or from the boiled giblets/chicken neck). The paste will bubble and thicken. Keep adding the broth bit by bit, stirring until smooth, until the gravy reaches your desired thickness. Taste and salt/pepper if needed. By now the chicken should be rested and ready to eat!
Grocery Budget & Meal Plan for March 11-18
Posted: March 12, 2017 Filed under: Budgeting, Meal Plan | Tags: cheap eats, gluten-free, grocery budget, hungry harvest, meal plan Leave a commentDon’t worry, I’m less pouty this week. 😉 Our groceries are usually driven by what’s in our produce box, but especially this week. Usually there are one or two veggies that don’t quite get used up, but this meal plan is on track to take advantage of every single one of them! My cart at the store felt a little empty this week, but I know I was buying slightly higher-priced items that will pack a lot of punch–whether that punch is flavor, protein, creaminess, etc. Also, more unusually, I bought three different protein items this week, and they will all be used for this week. Not too much stocking up this time, though, as always, some items will stretch! And in spite of my empty-cart concerns, you can see that when it is all laid out on the counter, we have our usual amount of food.
Our box is fairly out of season, with what I can only presume are hot-house tomatoes, cucumber, and corn. I’m more exciting for HH’s source of fingerling potatoes. We’ve gotten a them a few times recently and any new/tiny potatoes are high up on my favorites list! I took a chance on some frozen mussels this week, to supplement a “Low Country Boil”. M isn’t too keen on shrimp at the moment. So, of course, I am all about them, suddenly. Isn’t that always the way? Anyways, it’ll be a different twist to use up the corn and potatoes and we can each favor our preferred seafood.
I still didn’t have quite enough to spring for some nuts, but I still have my change from last week to build upon. Plus, I got the chance to actually note the price-per-ounce, and was surprised to find that (while Aldi wins out on pricing for most types of nuts), I can get raw walnuts for cheaper at Trader Joe’s. In the meantime, I managed to squeeze some no-sugar-added peanut butter into the budget, along with some dried banana chips. These will make another snack option for us. Plus, I’ll be able to make a super tasty peanut dipping sauce for our summer rolls this week.
I’ve also noticed that, without much effort, this $50 budget is forcing us to eat less meat. I have tried in the past to reduce our meat consumption, but never really found a my groove to sustain it. Nowadays, we usually have about 2 dinners that are meatless each week, and at least one more where meat is more seasoning that main dish. We just don’t have the budget to have a piece of meat, each, plus sides. Especially when our dinner leftovers are often becoming our lunches. So that was interesting to see that I’ve naturally adapted to the less meat.
Finally, our Hungry Harvest box always send out an email on Thursdays, listing what is in each week’s box. That’s wha kickstarts my meal-planning each week. Of course, they always note that the contents of the box may be different. Customers are able to make lists of vegetables and fruits that they do not like, which will be swapped for something else. Also, since Hungry Harvest sources from recovered produce, there is always a chance that there will not be enough of a certain type of produce to fill every box, or that an item might spoil before packing time. This week is a good example. The email listed that my box would have 2 grapefruits: we opened it up to find a grapefruit and 3 kiwis in substitution. I’m certainly not mad about it. I like kiwis, and since we eat most of our fruit raw, I don’t necessarily have a recipe hinging on that second grapefruit. In fact, the kiwis are much easier for me! M doesn’t eat much fruit, but I like to have a piece in my lunch and at breakfast, if there is enough. Last week, our apples and oranges were only enough for my lunches. I’m happy, with the one grapefruit split in half, to have fruit with some of my breakfasts this week.
Here is how I spent this week:

Hungry Harvest Produce Box: $15.00
Aldi: $31.13
Trader Joe’s: $3.86
Total: $49.99 (heyyyyyy!)

Hungry Harvest Produce Box: 1 english cucumber, 2 ears of corn, 1.5 lb fingerling potatoes, 1 butternut squash, 1 pint cherry tomatoes, 1 grapefruit, butter lettuce, 3 apples, 3 kiwis.
Aldi: white wine, gluten-free bread, mushrooms, almond milk, parmesan cheese, butter, kielbasa, cheddar, frozen berries, frozen mussels, peanut butter, bratwursts
Trader Joe’s: tofu, banana chips, lemon
Here’s what we are eating:
Sunday: Low Country Boil with ciabatta rolls using the mussels, kielbasa, corn, potatoes, lemon, butter, and a little wine from this shopping trip, plus shrimp and bread rolls from the freezer and spices from the pantry
Monday: Tofu Summer Rolls with Peanut Dipping Sauce using the tofu, cucumber, butter lettuce, and peanut butter, plus rice paper wrappers and vermicelli noodles from the pantry and chili sauce, carrots, and peppers from the fridge
Tuesday: Leftovers The usual.
Wednesday: Cheesy Butternut Squash Pasta I’m going to try this riff on mac & cheese with half of our squash (I’ll freeze the rest), some of the cheddar, plus pasta from the pantry.
Thursday: Mushroom Risotto with Roasted Tomatoes another favorite meatless meal, using the mushrooms, white wine, tomatoes, and parmesan, plus broth, rice, and spices from the fridge/pantry
Friday: Toad in the Hole (Sausages & Yorkshire Pudding) with Gravy and Vegetables A nice, traditional UK dish for St. Patrick’s Day, for anyone who isn’t much of a fan of boiled meals… I considered a variant on my shepherd’s pie, but this was more cost effective for this week. The bratwursts, because they were the only non-italian sausages I could find, plus a lot of pantry ingredients.
Saturday: Out/Leftovers We are going to a movie with some friends. Dinner is still up in the air, but we will definitely have various leftovers, if we decide to eat at home.
Breakfasts will be yogurt, fruit, eggs, oatmeal, or toast. Lunches are mostly leftovers, with the option of cheese & crackers, PB sandwiches, and/or hard-boiled eggs to fill in. Our small, but growing snack stash includes: cheese, popcorn, PB+banana chips, and (if I get my act together today) pumpkin muffins.
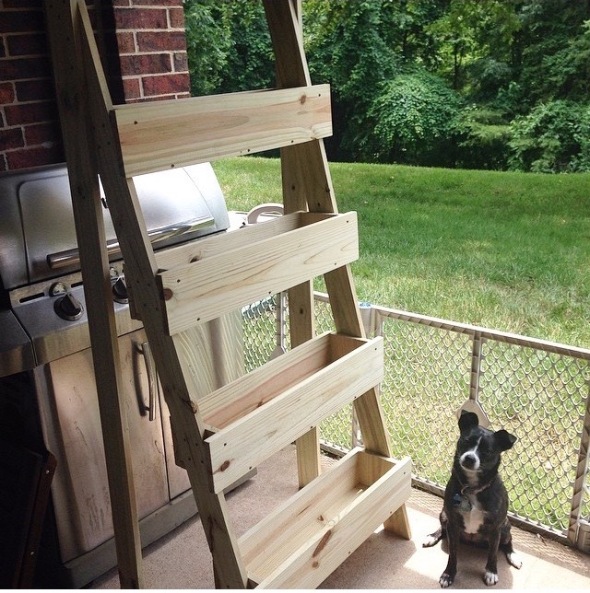
DIY Ladder-Style Upright Herb Planter
Posted: March 9, 2017 Filed under: garden, Non-recipe | Tags: building, carpentry, crafts, DIY, garden, herbs 1 Comment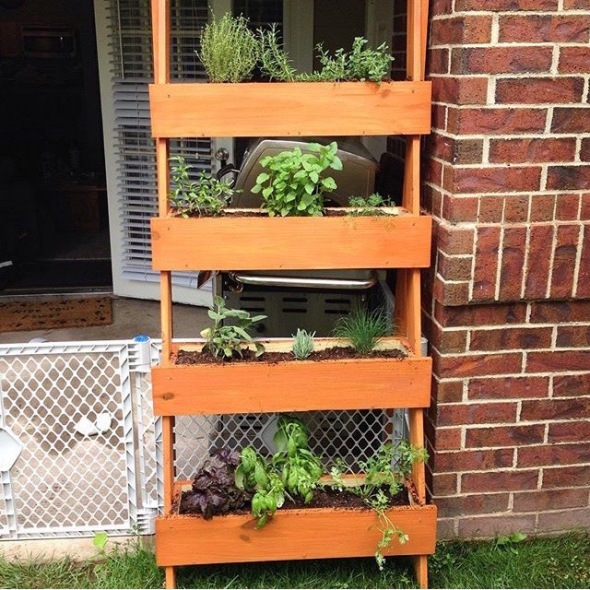
I’ve finally pulled together all the specs to share my herb planter with you! I built this in an afternoon two summers ago and I still remain immensely proud of it! 🙂 It’s nice to have access to herbs near our patio, rather than having to walk up to the garden before I prep dinner (though I do that often, too). I adapted my planter from Ginger Snap Crafts, but I made several changes: I dropped the planter down to just 4 troughs and I added legs so that it could stand freely, instead of leaning. Our patio is covered, so if our planter had to lean on a wall, it would by too far back under the roof and wouldn’t get any sunlight at all. The additional legs allow it to stand on the edge of our patio to take advantage of the afternoon sun.
Also, when I was putting together my planter, I found that the directions weren’t as clear as I would have wished–for instance, while it specified 8 ft long boards, it never gave their width, nor really explained how best to divvy up the cuts needed for the boards. I did some guesswork along the way, so I’ll do my best here to be thorough with my modified herb ladder!
First things first: I was definitely trying to spend as little money as I could, without resorting to dumpster diving or curb-scouting my lumber. So pricy cedar, while beautiful, was definitely out of the question. Since I also knew that I would need extra lumber for the legs to make the planter stand upright, I started to play with the math. I realized that if I cut the number of planting troughs down to 4, I would only need 4 boards to create the troughs. Plus 2 more for the slanted legs and 2 more for the upright legs. That still kept me at 8 total boards of lumber, but, pretty quickly after I looked at the Home Depot website, I realized that I could save some money by adjusting the type of boards I used for the legs of the planter, compared to the type of boards that I used for the troughs. I ended up using the same boards for all for legs, which were thinner in width. In poking around Home Depot for some current prices, thinner boards definitely saved some money. I’m happy to say that (with the lumber I sourced in the links) this planter still clocks in at under $50 to make!
A note on cuts: Home Depot will make a few cuts on lumber for free, or for a few cents, depending on your store. But this project calls for many more cuts than is worth trying to do in the store. Find yourself a saw (and some training in how to use it!) or a friend with a saw and knowledge. I called in a favor with a carpenter friend, who used the saw at M’s work to make the cuts for me in about 15 minutes. A hazard of my theater degree and my varied basic knowledge of carpentry, costuming, etc, is that I look at A LOT of projects and think “I can figure that out. And if I can’t, I have friends who can!” It has held true, so far! Take advantage of your resources, folks! 😉 I also borrowed a drill gun from work (returned in perfectly good form, with the battery recharged!)
So, let’s get started. Here is your materials list:
- 4 boards: 1 inch thick x 6 inches wide x 8 feet long (pine was the most affordable for me)
- 4 boards: 1 inch thick x 3 inches wide x 6 feet long*
- 1 box of composite deck screws (1 5/8 inches long)
- Optional: 1 sample can (8 oz) Weatherproofing Outdoor Wood Stain & Sealer**
*If you think you will be moving this planter often, perhaps bump up to a 4 inch wide or 2 inch thick board for the legs. Mine seem slightly spindly, but since I don’t move it often, they haven’t been a problem. You can also cut out two boards completely, if you want the planter to lean against a wall or a fence.
**Preferably from the reject/discount section, if you are bold enough to risk the color not quite matching the image on the label. My Home Depot taps a bit of the stain onto the lid, so you can get an idea of the color. My stain was also Semi-Transparent, which allows some of the wood grain to still show through.
Your tools needed:
- C-clamp or a second person to be an extra pair of hands
- Drill (preferably cordless) with drill bit and screwdriver bit
- Saw
- Pencil
- Sandpaper
- Optional: level
- Optional: paintbrush + dropcloth
Let’s get started!
Purchase your materials and gather your tools. Measure and make your cuts to the 4 lengths of 1″ x 6″ x 8′ boards:
- Board #1: we cut 3 lengths at 27 inches and 3 lengths at 4.75 inches. There will be a small piece of scrap left over for every board.
- Board #2: the same– 3 lengths at 27 inches and 3 more lengths at 4.75 inches
- Board #3: cut 2 lengths at 27 inches, 2 lengths at 4.75 inches, and 1 length at 30 inches
- Board #4: cut 3 lengths at 30 inches
Now you should have (in total): 8 pieces of wood that are 27 inches long–these are the bottom and backs to each of the 4 troughs; 8 pieces of wood that are 4.75 inches long–these are the sides of your troughs; and 4 pieces of wood that are 30 inches long–these are the front of your troughs.
You also have the 4 pieces of 1″ x 3″ x 6′ lumber. These are the legs of your planter. Leave two of them alone and for the other two, cut a 15 degree angle off of one short end. Line it up at a corner and you will be cutting a slight diagonal off. This allows the side legs to be slanting, yet still sit flat on the ground. Look back at the above picture, at the bottom of the leg nearest the dog.
Now you are done with cuts! Let’s get started putting this together!
Start by making your troughs: The bottom piece will be sandwiched in between the back piece and the front piece, rather than capping/overlapping the sides. So, if the bottom board is flat on the ground, the back and front piece come down on either side to also touch the ground. This is because your very short 4.75 inch side pieces sit in the U-shape made by the back, bottom, and front pieces. So the hole in the trough is a full 6 inches wide by 25 inches long (you lose an inch to each side-piece) by 4.75 inches deep. Make sense? I’m doing my best to explain, but this was definitely where I had to stop to figure it out. The pieces should fit together like a puzzle. If you are confused, take 2 each of the 27-inch lengths and the 4.75-inch lengths, plus one of the 30 inch length and just hold them together (without fastening them) until you side the box. Remember, the front has excess that overlaps on each side by 1.5 inches, to eventually overlap the side leg boards. Click through the Ginger Snap Crafts link above, she has some photos that help to visualize all of this!
I started by screwing together the bottom and the back boards, because they were even in length. I just stacked some extra pieces to hold steady the board and screwed it into place with 3 screws along the back seam. The I added the 30-inch front board, so I was making a U-shape, or 3 sides of a square. I centered the board so that there was 1.5 inch overhang on either side, and then screwed the front piece in with 3 screws. Then I was able to wedge in the 2 small side pieces. These, I secured with 2 screws (one at the top and one at the bottom) of the back board and with 1 screw at the top of the front board. That is one trough done! Repeat 3 more times until all 4 troughs are built. Swap your screwdriver bit for a drill bit and drill 3 to 4 drainage holes in the bottom of each trough, to ensure that your herbs’ roots won’t be drowned.

This is when that second person or your C-clamp becomes your best friend. We are going to attach the 4 troughs to one of the slanted side legs.
I started the first trough so the bottom about 4 inches up the slanted leg off the ground, but you could even go higher and have the bottom of the trough be 6 inches off the ground. I measured 12 inches along the slanted side leg between the bottom of a trough and the bottom of the next trough up (below). I also placed the troughs at angle, so the overhang of the front board was straight up, and there was about 3.5 cm space between the front edge of the slanted side leg and the front board of the trough (above). I marked the diagonal line in pencilon the side-board of the trough, to line up with the legs and then I also marked on the leg where the top and bottom of each trough should line up. I set each of the four troughs on their side so they stood upright, then laid the slanted leg board over top of all four troughs and adjusted until each trough lined up with my marks. Make sure that the diagonal cut–remember the 15 degrees we took off of one end of two of the boards?–is DOWN. The diagonal end will sit flat on the ground! That’s what gives you the ladder-style slant. Scroll back up to the photo of my un-painted planter and look at the bottom of the front leg near Punc. See how the diagonal is resting completely on the ground?

Starting at one end, clamp the side leg and the trough that you are about to screw on. I used 4 screws in a square-ish pattern to secure the trough side to the slanted leg. Once secure, undo the clamp and move on to the next trough, making sure to keep all of your marks lined up with the appropriate edges as you clamp it down. After securing all four troughs, you can flip it over as one piece and line up the second slanted side leg. Make sure that you re-measure and re-mark with your pencil the angle on the other side of the troughs and where each trough should land along the second slanted leg. Repeat with the clamping and securing each trough. Now you should have a 4-trough planter on two slanted legs. If you simply want it to lean against a wall or a fence, you are done building!
If you want your planter to stand upright on it’s own, you need to attach the two final, straight legs in the back of your planter. I lifted my trough-side leg combo and leaned it against a wall so that I could be sure that the planter was level and my diagonally cut bottoms of the slanted side-legs were flat on the ground. Then, I slipped the two straight boards on the outside the slanted legs, making sure they were upright, with their straight bottoms flat on the ground. I clamped the two legs together above my top trough and secured each side with 6 more screws evenly space throughout the space where both legs came together. Then I repeated the process on the other side.
AND NOW YOU HAVE A PLANTER! Celebrate! Get a cold drink! You aren’t done, though. 🙂 You could be. The planter is built and it will hold plants and soil. But the wood is completely unfinished and it will eventually degrade in all the weather outside. If you would like to prolong the life go the planter, you should seal the wood. I did not seal to inside of my troughs, where the soil and plants will go, so as to minimize the chemicals that might leach into the soil and then into my plants. However, I did seal the outside of the planter, to better protect against the elements. If you are going to paint the wood, spend a little time smoothing all of the wooden surfaces with sandpaper. Especially your cut sides, which will be the roughest. I like to use a dry paintbrush to go over all the surfaces after sanding, just to really make sure that all of the sawdust is off of the surface of the wood before I paint.
The paint I’ve linked to, above, is the type I found: meant for the outdoors, meant for weatherproofing, meant for use on wood, and–best of all–a stain/sealer combo which means that I didn’t have to paint/stain the whole thing and then do it all over with the separate sealer! Win! My sample can was just barely enough to put 2 thin coats of stain on all of the outside surfaces of the planter. I did one coat in the afternoon and the second the next morning. Follow the directions on the can–mine required the stain to “cure” for 72 hours without getting wet. This was pretty easy, since our patio is covered. I moved it as far back as I could to keep it shelter, because, of course, it rained during those 72 hours, but my planter was no worse for wear.
NOW YOU ARE DONE! After 72 hours–or whatever time is recommended on your can of paint/stain/sealer, you can fill up each trough will soil and start planting! Just remember, like potted plants, these plants in the troughs need to be watered more frequently because the shallower soil will dry out more quickly. This summer, my planter will be 3 years old and it have held up beautifully!
Grocery Budget & Meal Plan for Mar 5-11
Posted: March 6, 2017 Filed under: Budgeting, Meal Plan | Tags: budget, groceries, grocery budget, meal plan Leave a commentIt’s been a weird week, folks. Maybe it is the weather finally acting a little like winter, maybe it’s stress, but I have been in a bit of a funk all week. To top it all off, I allowed myself to get a little excited as I wrote my grocery list, because it seemed like so little. I thought I’ve have more than a few dollars to stock up. Unfortunately, I forgot how much dairy eats up our budget. Don’t you dare try to swing me on that dairy-free lifestyle–I absolutely love all things dairy. Cheese, ice cream, milk, yogurt…<3 But our current consumption schedule has made it so that we tend to run out of our dairy products in the same week, and then there goes my budget.
I’ve been wanting to get some nuts for snacking and some sauces and such, but my extra dollars usually go towards something more pressing. This week, I did know that I wanted to spring for some of those herb paste tubes at Giant. Specifically, one each of cilantro and lemongrass. They are a few dollars each, but (especially the lemongrass) lasts forever, since the paste is concentrated. So while I was disappointed to pass up the cashews, I knew that I would be rewarded with super flavorful dishes. And, maybe I could stop spending $1 each week on fresh cilantro. However, I definitely underestimated the price of these herb pastes. I thought I had saved enough money to get both, but these things are $4.50 a piece!! Oy. Only one this week, then. The lemongrass is definitely worth it, so I will have to save a few dollars to pick up that one soon, but I will pay attention to our use of the cilantro paste to see if it is actually worth that price.
I mostly let go of my deprivation funk today when I realized that we have popcorn kernels in the pantry and then when I used one of last week’s zucchini to make my Chocolate Surprise Muffins. (I used all flax eggs, plus replaced all of the various vegetables with one large zucchini, undrained. Also added in a 1/2 cup of shredded coconut! They ended up being vegan.) A little bit of that crunchy popcorn and chocolate went a long way towards making me forget the cashews, peanut butter, and chips that were left behind at the store this week.
I also planted the first seedlings of the year in our garden plot! Kale and swiss chard, to hopefully survive our cooler temperatures. I also planted some carrot and radish seeds, which will have a few weeks for the weather to warm up by the time they sprout. A second batch of bone broth had been in the crockpot for a few days, as the last of the broth from the previous batch will be used up in this week’s soup. I also tried flavoring my kombucha for the first time: with vanilla beans, which made a perfectly pleasant brew. I’m even getting M hooked on kombucha, now that it is readily available!
Here is the breakdown for this week:
Hungry Harvest Produce Box: $15.00
Aldi: $26.27 ($8 was spent on a pilates ring I found in their home-goods aisle. Super excited to try that out! But of course, it doesn’t count towards our food budget.)
Giant: $6.23
Total: $47.50
I came out under budget this week. I’ll put the change towards last week’s overage and keep the $2 in bills for a future trip. Maybe this is how I’ll be able to afford those cashews…build up my change!
This week’s groceries:
Hungry Harvest Produce Box: 2 bell peppers, 1/2 lb. brussels sprouts, snow peas, 2 oranges, 3 apples, an onion, 3 sweet potatoes, 2 carrots, and a pint of cherry tomatoes
Giant: coconut milk, cilantro paste
Aldi: goat cheese, sausages, ground ginger, persian cucumbers, hummus, spinach, yogurt, half-n-half, artichoke hearts, white northern beans, an avocado, bread, milk
Plus a dozen eggs from my mother’s chicken lady hook up. 🙂
Here is the meal plan for this week:
Sunday: Roast Chicken and Vegetables with gravy using the whole chicken from last week, some bone broth from the freezer, lemon from a few weeks ago, and some of this week’s carrots, sweet potatoes, and onion
Monday: Zuppa Toscana using last weeks red potatoes and kale (I found the recipe right after I made last week’s meal plan and knew I needed to make it!), plus the last of the bone broth and some sausage, white beans, and half-n-half from this week’s groceries
Tuesday: Leftovers M is out, as per usual, so I will figure something out, or eat more soup.
Wednesday: Veggie Curry Stir-fry using this week’s snow peas, peppers, carrots, brussels sprouts, and coconut milk, with curry paste from the freezer and rice from the pantry
Thursday: Tomato & Goat Cheese Tart with salad I froze the other half of the pie dough when I made quiche last week. That will thaw, then drape over those cherry tomatoes, tarte tatin-style, with a little balsamic vinegar and dried thyme from the pantry. Goat cheese will be crumbled on top after it’s cooked. I’ll pair it with a salad that uses up any remaining kale plus some of the spinach
Friday: Tuscan Chicken Sandwiches based on what I ate from the sandwich shop almost every day of my freshman year of college, before I was gluten-intolerant. Some chicken from Sunday’s roast, with goat cheese, spinach, (freezer) pesto, roasted red peppers, artichokes, and aioli. If I feel extra proactive, I might try some baked sweet potato chips
Saturday: Chicken Tacos with the last of the roast chicken, plus tortillas and various fixings from odds and ends in the pantry and fridge
Breakfasts will be yogurt with fruit, zucchini muffins, avocado toasts, or eggs. Lunches will be leftovers from dinner or cucumbers and hummus + hardboiled eggs, with fruit.